![]()
Why use a boom? Because of all of the techniques available to us, the simple boompole with shotgun mic allows us to get the most professional audio with the least amount of fuss. Let's briefly look at our options for acquiring dialogue.
Built-in camera mic. Okay for wide pickup of stereo sounds, such as music or choral. Not much front reach, and lots of side pickup. Horrible for dialogue or anything happening more than a couple feet in front of the camera.
Shotgun mic, mounted atop the camera. Success or failure using an (aftermarket) mic as a replacement for the built-in camera mic is really dependent on the QUALITY of the mic that you purchase. You get what you pay for! If the mics are plastic or have mini connectors (as opposed to XLR 3-pin), RUN AWAY. On the other hand, cheap shotgun mics make good martini stirrers at cocktail parties.
In terms of what to expect from a mic mounted atop of the camera, it will have much greater reach than the default stereo built-in mic. Side pickup will be minimized (but do not expect miracles) and front reach will be optimized. Remember, though, that any sound emanating from behind the subject will be magnified similar to the way that background objects are "brought closer" to the subject when you use a telephoto lens. Indoor, sound from behind or to the side of the camera may bounce off of the walls and end up being reflected towards the camera (and mic), much to the chagrin of good dialogue.
Also bear in mind that the average camera to subject distance, even for a close-up interview, is seven to ten feet. Any closer than that and the subject feels like the lens is right in his/her face! Seven to ten feet is a lot of feet when it comes to microphone reach. Most shotgun mics do their best at around three to four feet (for soft spoken dialogue).
The best sound quality would be achieved by a combination of two things: reduce the distance and make the bad unwanted sound strike the shotgun from its least sensitive pickup angle. Doing that is easier than it sounds. Just use a boompole and mic the subject from overhead.
The boompole allows the mic to be positioned much closer (overhead) to the actors than the mic would be if still aboard the camera. Three to four feet above the actors is ideal for audio, yet still provides an awful lot of "headroom" for visual composition. A wide shot only needs to be wide from left to right, not from top to bottom! That's why tripod heads have a tilt mechanism.
Because the shotgun mic is suspended overhead, it will point downwards towards the faces of the actors. The most sensitive pickup area of a shotgun mic is on-axis. Surrounding noise will approach the shotgun mic from 360 degrees around it, perpendicular to the on-axis. In other words, the front of the mic will hear the most, and the sides of the mic will hear the least.
What about lavalier mics worn by the actors? In Hollywood, we only deploy lavs if we cannot boom the shot.
Lavaliers are fine if you only have one or two actors (or interview subjects). Rigging lavaliers takes some skill to properly use the mounting clips and hide the cables. And if there is no button down shirt or jacket lapel to attach the tieclips to… life gets very tricky or mics/cables look very ugly. Unless you want to deal with sexual harassment issues, I would not encourage young students to rig lavaliers under clothing!
Lavalier mics and wireless mics have a myriad of small parts (tieclips, mini windscreens, antennas, output cables, etc.) that are easy to lose. Make sure that you have a good system for checking equipment in/out or you will find yourself with a lot of downtime. I deal with a local high school (for nerds, no less!) that cannot keep track of production accessories and is constantly short of (working) inventory.
Let's go shopping for a good boompole and shotgun mic system.
 I hate to tell you this, but a good boompole will cost $250 to $400. A lot of machining and detail work goes into building a strong, yet lightweight and quiet, boompole.
Carbon fibre (graphite) versus aluminum. There are a lot of myths about the "advantages" of carbon poles, but metal has some distinct benefits. The biggest myth is about overall weight. In the olde days, boompoles were constructed (it seemed) from pipe metal and could get really heavy. These days, we use aluminum alloy that is lightweight and durable. The difference in weight is negligible. Add the weight of an internal (or external) mic cable, shockmount, and the mic itself -- and it is not even worth computing.
Metal poles are far less expensive and far less fragile. They are quieter since the outer pole sections do not conduct vibration and handling noise as enthusiastically as carbon does.
A good length for a boompole would be 9 to 12 feet extended. Since the poles telescope, it is simple enough to collapse the sections if you are only doing news or documentary and do not need that much reach. But if you are doing narrative/dramatic films, the added length is necessary to keep the boomperson out of the shot.
Even if the boomperson does not need all of that length, it is far easier to hold a boom closer to the center of gravity than from the farthest end. Leverage can make a three pound boompole (with mic) feel like 20 pounds!
Teach the boomperson to hold the boom completely overhead with both arms so that the boompole is horizontal. The supporting arm should be straight up and down and held close to the head. If the supporting arm is held at too much of a horizontal angle, it puts strain onto the shoulder. Think of a gymnastic iron cross. The rear arm is the "steering" arm and controls the boom.
Supporting the boompole on a diagonal (like carrying a flagpole) will often cause the pole to cut across the frameline. If the boomperson cannot physically hold the pole for the duration of the shot, then position a lighting stand (with a sandbag or pillow on top) just under the elbow of the boomperson's arm. He or she can rest their elbow on the stand and take the weight off of their shoulder, yet still be in control and ready to move the boom if they have to follow the actors.
My favorite brand of boompole is K-Tek. They offer a metal 9 foot version (KE-110CCR) and a 12 foot version (the KE-144CCR). Prices are $275 and $350.
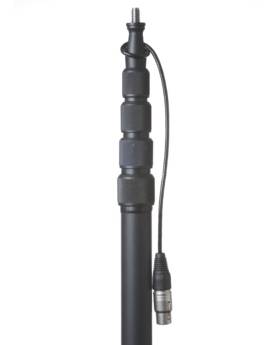
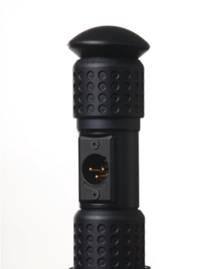 The CCR designation is very important, as it denotes an internal coiled mic cable with a side-mounted XLR connector (see right). At the top of the boompole is a short XLR cable for attaching to the microphone. At the base of the boompole is a (chassis mount) XLR male connection for attaching to a standard microphone extension cable. This allows you to use as long or as short an extension cable as needed to connect the boompole to the camera or recorder.
It is important to use a side-mount connection rather than the very common bottom mount connection found on many, less expensive boompoles. When mic cables are plugged into the BOTTOM of boompoles, they will get broken! Boom operators tend to use the protruding XLR connectors as "handles" when they are stretching for extra reach. At the end of the take, poles are rested on their ends, with mic cables still attached!
As for using external cables wrapped barber pole style around the outside of the boompole…count me out! It makes extending or collapsing a pole very laborious and inconvenient. Not done properly will result in a ton of cable (clunking) noise. A tight wind may be quiet, but will put a lot of kinks into a good mic cable.
Selecting a good shotgun mic. In my book, there are only two professionally proven choices: Sennheiser or Audio Technica.
Sennheiser invented shotgun mics and has been the Hollywood standard for decades. Their most popular short shotgun offerings are the Sennheiser K6/ME66 and the MKH60. The ME66 is an electret condenser type of mic, very popular for lower budget applications, and is around $450. It operates from an internal AA battery or from external Phantom power (only found on higher end prosumer camcorders or portable audio mixers). The MKH60 is a full condenser mic and only operates from 48v Phantom power. It is very popular on feature film sets and is way more sensitive than the ME66. It is also way more expensive, around $1500.
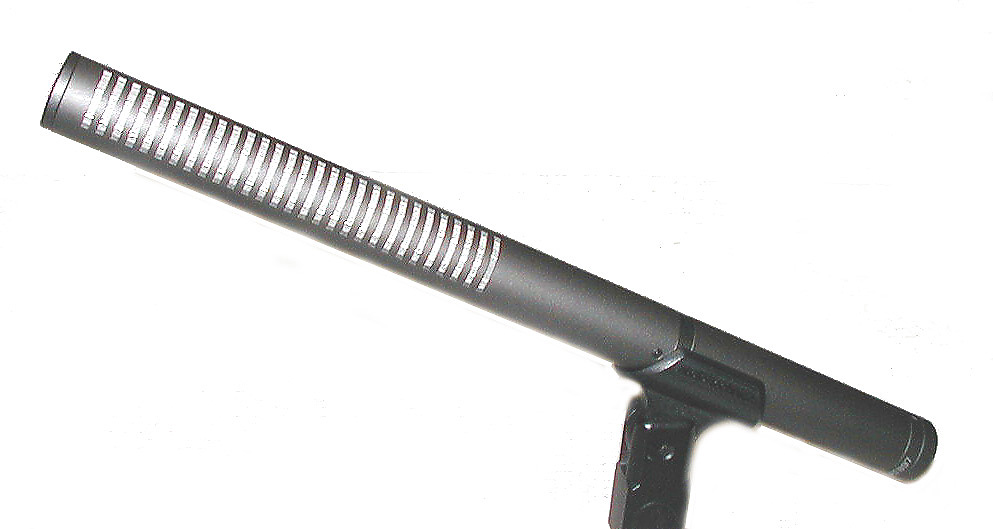 Audio Technica is an alternative. They make fantastic microphones and are also extremely popular in Hollywood circles. What I like the most about Audio Technica is their affordability (without compromising quality) and their exceptional customer support. The AT897 (seen left) is comparable to the ME66, yet only sells for $250 (including the foam windscreen). It works off of an AA battery, or can use Phantom power. The BP4073a is a full condenser mic, and only operates from Phantom power. Price is in the low $500's.
Personally, I find that the AT897 outperforms the more expensive ME66 both in terms of strong front reach as well as overall sound quality (fullness). It is definitely a first choice for most video production classes.
 The BP4073a (seen right) is absolutely top notch, but is a little more expensive (yet far less costly than the MKH60) than the simpler mics. It would be my choice for elite student projects or faculty produced works; but not for the majority of students.
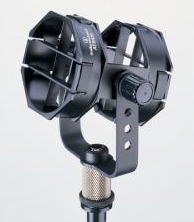 To mount a shotgun mic onto a boompole requires a device to not only hold the mic but to insulate it from vibration and handling noise. We call these "shockmounts."
Two of the industry's favorite shockmounts are the Audio Technica AT8415 "universal" shockmount (and the K-Tek K-SM.
The AT8415 (seen left) features criss-crossed "rubber" mic bands and sells for under $60.
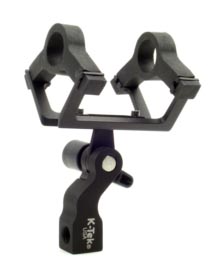 The K-SM (seen right) uses a molded inverted "V" arrangement and sells for $135. The K-Tek is a little more student friendly since they do not have to master the art of over-under-ing the bands; but the AT8415 is around half the price.
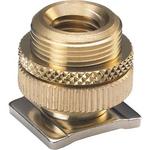
Audio Technica also offers a brass camera shoe adapter (the AT8469 Camera Mount Adapter, seen left) that allows you to mount either shockmount to a camcorder.
 With some quick modifications (as seen to the right), you can make it even tighter and more efficient by following the steps:
A useful trick (see right) for making the standard 5/8 adapters more field worthy is to insert a 3/8-16 set screw into the threaded opening in the 5/8 portion of the adapter. Use some thread adhesive or glue to secure it. Then add a small rubber washer where the shaft of the 3/8 screw protrudes from the body of the 5/8 shaft. Finally, slip a rubber O-ring over the entire piece so it rests below the lockdown nut.
 Now, when you attach your 3/8 shockmount to the camcorder, it will fit directly onto the 3/8 to camera shoe adapter and no longer require the removable 3/8 to 5/8 adapter. The friction of the rubber washer will allow you to quickly align the shockmount so that the mic is pointed directly forward (without wrestling with metal friction nuts that never seem to lock down precisely). And the O-ring fills any gaps between the lockdown nut and the camera shoe.
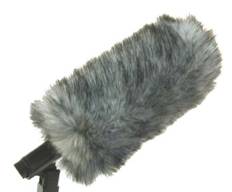 One more important item to add to your inventory is a furry windscreen for outdoor use.
Indoors, the standard foam windcreen (that comes with most mics) is sufficient. By the way, always use a windscreen because even the simple act of booming creates moving air against the mic. In addition, the foam windscreen acts as a protective pad in the event that the mic strikes a hard surface such as a wall, ceiling, or (gulp!) the floor!
Outside, though, the basic foam windscreen will do very little as far as blocking the wind from striking the microphone. K-Tek and Rycote both manufacture affordable "furry" windscreens that consist of acoustic foam surrounded by fake fur. The furry texture breaks up the wind and reduces resistance that could cause acoustic noise from air flowing across the surface.
I vote for the K-Tek Z-FSO-S ($110) for either the Audio Technica AT897 or the AT4073a. They are built right here in the good ole USA by good people and I like that. Good product, good customer support, and we can keep the bucks on our side of the ocean.