 The WRONG way to insert a mic.
Simply placing the mic into the center grid
formed by the rubber mounts will NOT
hold the mic securely!
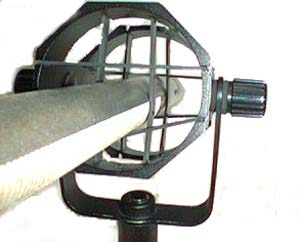
 The CORRECT way to insert a mic.
The lower rubber band mount is pulled OVER the top of the mic, and the top band pulled
UNDER the bottom of the mic for a firm grip.
If more tension is required for a heavier mic,
then the two side bands can also be crisscrossed.
Since the AT8415 does not utilize a plastic cradle of fixed diameter, it will support just about any mic on the market except for the longer and heavier shotguns.
Extra support for longer and heavier mics is achieved by criss-crossing the rubber bands so that the mic is firmly sandwiched not only within the top and bottom bands, but also sandwiched within the side bands Even more back support can be achieved by adding a second band directly over the existing band in the vertical plane. You may have to file out the slot a little bit to accommodate the two bands. Heavy duty spare EPDM (Ethylene Propylene Diene Monomer) bands are available from some dealers.
The yoke of the AT8415 is drilled and threaded to accept a 3/8-16 thread-sized mounting stud, such as those found on standard boompoles. A removable adapter is supplied by the manufacturer for use with common mic stands and goosenecks, which have a larger 5/8-27 thread.
The AT8415 is definitely a "best buy" considering its low profile appearance, design simplicity, adaptability to a wide variety of mics, and excellent isolation performance.
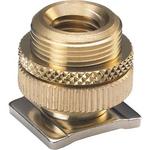 To attach the 8415 mount onto a camcorder, use a 5/8 to camera shoe adapter, such as those available from dealers (seen left, the AT8469 Camera Mount Adapter).
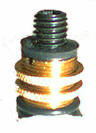 A useful trick (see right) for making the standard 5/8 adapters more field worthy is to insert a 3/8-16 set screw into the threaded opening in the 5/8 portion of the adapter. Use some thread adhesive or glue to secure it. Then add a small rubber washer where the shaft of the 3/8 screw protrudes from the body of the 5/8 shaft. Finally, slip a rubber O-ring over the entire piece so it rests below the lockdown nut.
Now, when you attach your 3/8 shockmount to the camcorder, it will fit directly onto the 3/8 to camera shoe adapter and no longer require the removable 3/8 to 5/8 adapter. The friction of the rubber washer will allow you to quickly align the shockmount so that the mic is pointed directly forward (without wrestling with metal friction nuts that never seem to lock down precisely). And the O-ring fills any gaps between the lockdown nut and the camera shoe.