Hiding Lavs Under Clothing
Hiding a microphone under clothing requires much more attention to detail. Not only must the mic be hidden from view, but you must also contend with the problems of clothing noise.
 Clothing noise comes in two varieties: Contact and Acoustic.
Contact clothing noise is caused by clothing physically rubbing against or striking the mic capsule or mic cable. The best means to eliminate this type of noise is to immobilize the clothing around the mic. If the garments cannot move in relation to the mic, then they cannot rub or strike the mic!
Different sound mixers have different techniques for accomplishing this feat, but my preference is the use of sticky triangles (often augmented with pins).
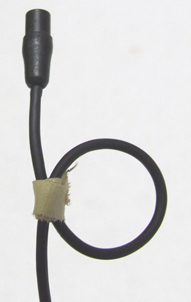
But first, we have to eliminate cable noise. Do this by forming one or two complete loops of the cable just below the mic capsule. The loops should be around 1/2 inch in diameter. Tie the loops in place with a piece of thread or dental floss, or even a thin strip of camera tape sticky side out.
The loop should be secured loose enough to open and close freely when the cable is tugged. This becomes your strain relief. (See Right)
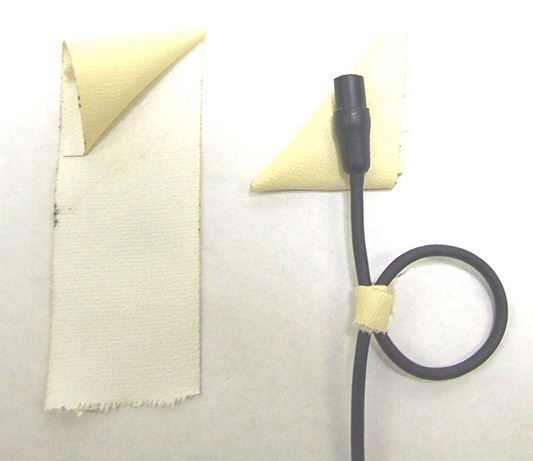 Secure the mic capsule within two small triangles of sticky tape. I make these triangles from a 1" wide by 2" long piece of camera or gaffers tape, folded corner to corner several times like a flag, sticky side always out. The mic is centered within the two triangles. Be careful not to tape over the grill or holes of the mic.
Round top mics are easier to rig, since they can be surrounded by the tape, with only the top grill exposed. Flat facing mics require more care, since the stocky triangles need to be offset so as not to block the side port.
This sticky triangle rig can be placed just above a button of a shirt/blouse (See Right). The cable loop falls opposite of the button itself. The next inch or so of the lav cable should be taped directly onto the shirt, with the tape lengthwise between buttons.
 Any tugging of the shirt or cable with be strain relieved by this strip of cable. The floating loop isolates the tugging from the mic capsule. The sticky triangles anchor the clothing on either side of the mic. A couple of straight (or safety) pins may be used to secure the triangle tips if humidity or long duration are concerns.
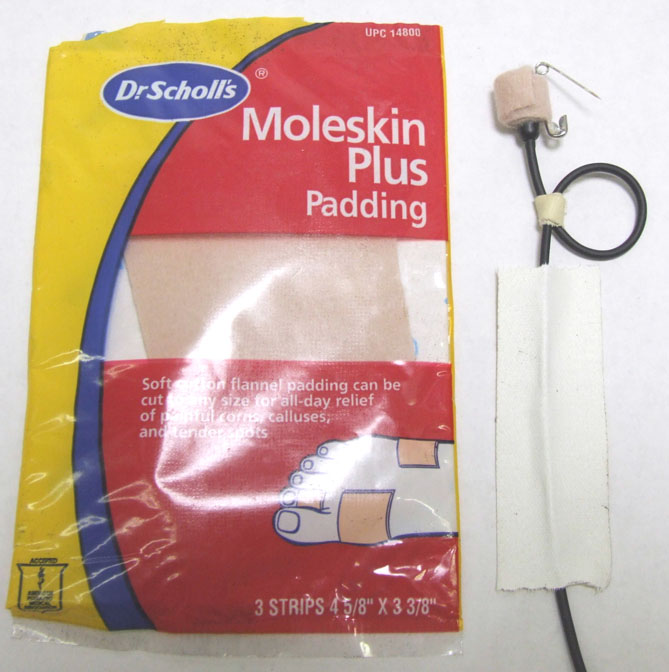 Another technique is to use Moleskin strips and a safety pin to anchor the weight of the mic and cable. This is very useful if the actor will be rigged for an extensive period of time, or if moisture (perspiration, humidity, rain, etc.) tends to loosen the hold of sticky tape.
Cut some adhesive backed Moleskin (found in the Foot Care dept of any supermarket or drugstore) into french fry size strips. Wrap a strip (adhesive toward the mic, softside out) completely around the body of the lav, insert an open safety pin, and continue the wrap.
The pin will securely hold the mic, but you may need to add sticky triangles to prevent clothing noise.
 When wiring a female equipped with a bra, the sticky triangle can be re-angled so that it is flatside up, pointy end down, and can be placed inside of the bra, in the cleavage at the "cross your heart" point. The swell of the bosom acts as a shield against clothing noise, and results in excellent sounding mic placement.
The other type of clothing noise is that of Acoustic Noise. Acoustic noise is created not from clothing rubbing against or striking the mic, but instead from the clothing rubbing against itself.
Static Guard works very well to lubricate clothing, such as jackets rubbing over shirts. Heavy starch conducts noise, so it is best dealt with by applying or spraying a little water mist around the mic placement area, as well as in any other areas that would not appear obvious to camera.
As a rule of thumb, cottons and woolens are the quietest clothing fibers. Synthetics and silks are very noisy and should be avoided as much as the situation allows.
Lavaliers can also be hidden in other areas than just center chest. Under the collar works well with sweaters and sweatshirts, or women’s blouses. Going under the collar of a dress shirt on a male may create a problem if beard stubble is present on the neck.
Less conventional mic sites include under the brim of hats, or hidden in the hair at the forehead. Small lavaliers can also be hidden on the frames of eyeglasses.
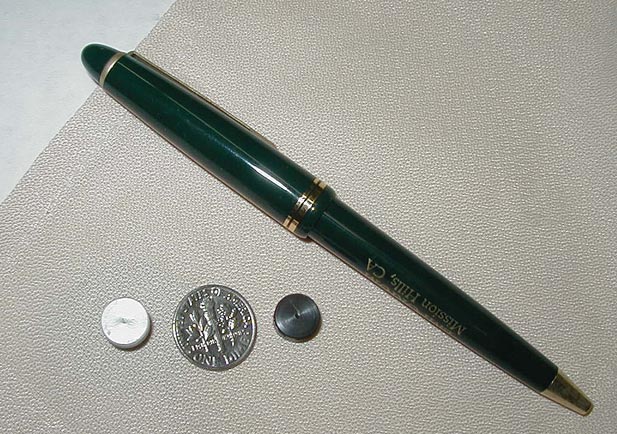
A very useful trick is to hollow out a plastic pen, and hide a lavalier inside. With but a very small incision in the back of a pocket, a pen mic can be planted in full visibility to the camera, with no clothing noise, and still remain completely "hidden."
 An interesting lav mic, now sadly discontinued, is the Pin Mic.
It is currently no longer imported into the USA, which is a shame, considering how well the concept worked. For more information about the PIN MIC, contact Coffey Sound in Hollywood, California. However, Rode is now offering a less expensive version of the Pin Mic, which eliminates clothing noise, but is no longer as concealable as the original.
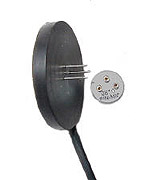
 Although this mic is worn outside of clothing, it is extremely concealable. The concept of the PIN MIC is so simple that it is brilliant. Instead of fussing around with tie bars, vampyre clips, unsightly cables, and awkward mic placement -- just poke the pins of the backplate thru the wardrobe and cap it with the microphone capsule! Because the microphone is outside of clothing, there is virtually no clothing noise to contend with.
Since the mic capsule mates to its electronics via PINS, you can position the mic almost anywhere on talent. You are no longer limited to lapels and center button-up openings. T-shirts, pullovers, and dresses are not a problem anymore.
On the camera side of things, all that is visible is a nondescript round capsule about the size of an aspirin. Using just the black or white sleeve covers that go over the mic capsule, the PIN MIC usually just blends into wardrobe on its own. But if you need better invisibility, you can attach whatever you want onto the face of the mic sleeve (the PIN MIC has ports on the circumference, so that the face is okay for mounting things to).
For example, you can cover the PIN MIC with a spare shirt button. Hide it under a corporate or station logo jewelry pin. Cover it with a snippet of cloth. Mask it with colored tape, or use a colored marker to paint some plain tape. One mixer that I know shoots & prints a digital picture of the wardrobe, and then pastes a snippet of the print over the mic to make it perfectly blend in.
Now we'll deal with the two biggest challenges when using lav mics: noise and perspective.