Clothing noise
Wireless transmitters do not suffer from clothing noise. However, the lavaliers plugged into them certainly do!
Rig your lavaliers the same as you would if they were hardwired.
For the benefit of readers who missed the article on lavalier mics, here are a few pointers:
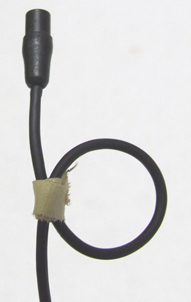 Make a small loop near the mic capsule. Secure the loop loosely with a piece of thread or a thin strip of camera tape (sticky side out). The loop should be able to freely open and close if the cable is tugged. This loop serves to cancel out most cable noise conducted along the rubber sheath of the mic cable.
Eliminate contact clothing noise by securing the wardrobe on both sides of the mic capsule. If the clothing is not free to rub against the mic head, then there won't be noise.
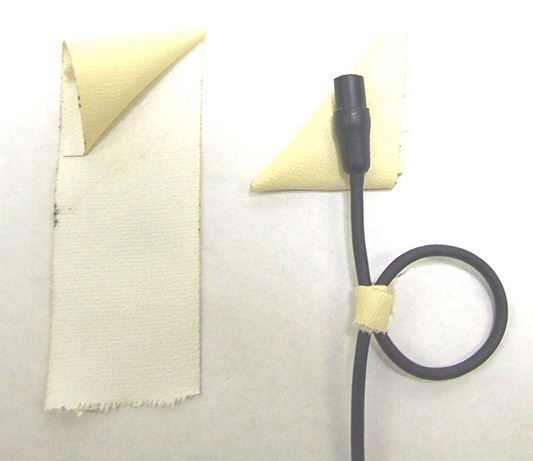 A popular technique is to sandwich the mic head between two sticky triangles made from camera tape. Start with a two inch long strip of (one inch wide) camera tape, and fold it corner over corner like a flag, sticky side out. Make a second triangle the same way. Then sandwich the mic between them, being careful not to block the grill.
In the case of a button down shirt or blouse, attach the sticky triangle onto the fabric overlap, just above one button. Let the tied off loop hang opposite of the button.
 Secure the next inch or two of mic line with a simple strip of camera tape along the overlap, running vertically downward towards the next button. Any tugging on the cable will be strain relieved by the section taped to the clothing.
The floating loop will isolate the mic capsule, and the twin sticky triangles will prevent clothing from rubbing across the mic itself.
Wiring a female can be simpler. If she is wearing a bra, arrange the triangles over the mic so that one point is down. Secure the mic inside of the bra, at the "cross your heart" juncture in the center of the bosom.
A small strip of surgical tape can be used to anchor the mic cable along the upper abdomen. The natural swell of the bosom protects the mic from clothing contact, as well as positioning it out from the chest cavity.
Clothing noise can also be acoustic in nature, and is created by clothing fibers rubbing against each other.
Starched clothing is very noise conductive, so soften the cloth with a light mist of water wherever the camera won't notice it, such as under the sports coat. Soften a patch of clothing around the site where the microphone is to be attached.
Combat noise from clothing friction with Static Guard.
Wind noise can be alleviated by salvaging the foam tip from a (used) video cleaning swab. Pull the tip off of the stick, and slice the base off. What remains is a foam hood that will slip over most lavaliers.
These free windscreens can be painted with marking pens to be less visible. And since they cost nothing, there is no risk of sandwiching them within tape that would destroy the foam upon removal.
Additional wind protection can be achieved by wrapping some cheesecloth over the mic. Cut off the fingertip from a pair of child's or woman's knit gloves, and pull that hood over the mic and cheesecloth.
 Another useful trick for rigging lavaliers is to use moleskin and safety pins.
This technique is particularly effective when you have to wire talent quickly, or if talent is going to be very physically active and might otherwise dislodge a taped on mic.
Wrap a layer of soft moleskin around the head of the mic. Insert an open safety pin, and then wrap another layer to secure it. The lavalier is now ready to be pinned in place under wardrobe. The moleskin tends to insulate the mic capsule from most clothing noise.
An additional strip or two of tape or moleskin can be added to help prevent clothing from rubbing against the mic, and to strain relief the mic cable.
In conclusion
Here are a few points to remember about wireless mics:
Don't expect miracles.
Even the best Hollywood sound mixers have to wrestle with their wireless. The range is never what you expect nor what the spec sheets claim, because you will not be operating in a perfect environment.
If you need increased range, try utilizing a dipole or yagi antenna system. You can request them when you rent or purchase your wireless. If the salesperson doesn't know what you are talking about, go to a real sound house run by mixers!
Another way to increase your range is to shorten the distance between the transmitter and receiver. Have someone carry the receiver and walk the distance parallel with the actor.
The more units that are working simultaneously, the increased likelihood of them interfering with each other.
Actors passing close to each other may generate a buzz. If you know that actors will be working close, assign them units on frequencies as far apart from each other as possible. Think carefully before you just grab a radio mic and stick it on someone.
Check your batteries often. Weak batteries in the transmitter or receiver are the main cause of problems.
Periodically re-check your transmitter rigging. Actors have a tendency of adjusting their wardrobe, and upsetting your carefully positioned mic and/or antenna placement.
If talent will be perspiring a lot, or working in rain or near water, then it is a good idea to encase the body pack transmitter in a protective condom and seal it with electrical tape. Use standard non-lubricated latex condoms.
But don't forget to warn your personal mate as to their professional use, lest they be discovered when you get home! You won’t need a wireless to hear the screaming from the next room.