![]() At first glimpse, a professional mixing board may appear intimidating to the novice filmmaker. But they are actually fairly simple to master, and are the heart of location audio recording.
At first glimpse, a professional mixing board may appear intimidating to the novice filmmaker. But they are actually fairly simple to master, and are the heart of location audio recording.
 In the olde days of 16mm film production, when videotape recorders were still too huge to bring outside of the studio, we recorded our location audio onto portable tape recorders known as Nagra's.
Yeah, yeah, you have seen pictures of those in magazines and textbooks. But today we all shoot on digital video, so what point is the author trying to make?
The point is that when audio was recorded on a Nagra, two important factors were different. To begin with, the audio recorder was under the direct control of the Sound Mixer -- not the camera operator! The second key difference was that the audio controls on the Nagra were extremely user friendly and designed for adjusting the gain (volume) of microphones during the take.
Today, most audio is recorded directly to video (single system). That means that the audio recorder is the camera; and that the controls for the incoming audio signal are on the camera. During a take, control of the camera is the domain of the cameraperson. The Sound Mixer cannot monitor recording levels, nor sneak a finger in to tweak a miniscule knob to make subtle adjustments.
Hence, the primary value of using a sound mixing panel to control your audio, before it gets to the camera to be recorded. (And those of us who are really serious about delivering perfect audio even simultaneously backup our soundtracks to portable digital audio recorders which WE have control over. Just in case the camera pointer accidentally messes up our settings on the camera.)
 The Mixing Panel gives us smooth control over the incoming audio signals. It allows us to adjust gain (volume) of the mics, to combine or route mic signals over one or multiple recording tracks, to filter out excess low frequency noise, and to blend multiple mics spread across a set so that it all sounds as if coming from one source.
There are two types of mixing devices used in our industry: Mixing Panels and Over-the-Shoulder Portable (ENG) Mixers.
The ENG Mixers are more common. They are basically small, battery operated devices that can typically accept three or four mic inputs. Volume is controlled by rotating knobs (technically known as pots or potentiometers). There are switches for cutting out extra bass. Essentially, these are very sophisticated "Y" cables that allow you to control the volume of multiple mics and combine them into a couple of tracks.
ENG Mixers are very portable, so they can be worn by a solo cameraperson or a solo audio person who might be doubling as the boom holder (my elitism prevents me from using the term boom operator when that person is belabored with so many audio tasks as is the case when he/she is working solo).
ENG Mixers have their role in life: Electronic News Gathering, Documentary, Cinema Verite, Run ‘N Gun. When you have to be mobile and able to move around quickly, wearing your equipment, the ENG Mixer certainly beats trying to plug your mics directly into the camera.
But if the shooting environment is a bit more sedate… The camera is at rest on a tripod. There are some lights powered by AC. Maybe even a field monitor for the Director to watch. In other words, we are SET BASED.
The Sound Dept (one person trying to do it all is an overworked schlep; a proper two person crew consisting of a Mixer and a Boom Operator is a Sound Dept) prefers to work from a proper Mixing Panel.
We've all seen mixing panels or mixing boards in post-production or at events such as concerts and plays. Enough knobs, switches, and settings to fill a cockpit. Isn't that sort of overkill for basic video production?
Certainly the very large, console mixing boards are overkill. But the vast majority of mixing panels are between the size of a three-ring binder and a lunch tray. Not very expensive either: you can get very good mixers for under $500. Some are even under $200. They are actually less expensive than the good ENG mixers, which have less features, but cost more because there are less filmmakers out there than musicians.
However, musicians use their mixing panels differently than filmmakers and videographers. In this article, we are going to explain how to use a mixing board for location dialogue, not for miking a rock band.
Basic operation of a two-track (stereo) Mixing Panel
Mixing panels are like automobiles. Once you learn how to operate one model, you discover that other makes and models are fairly similar. Some of the buttons may be in different places, but the operating principles are pretty much the same.
 Mixing panels are described as the number of inputs by the number of outputs. For instance, a 6x2 board would mean that there are six inputs that can be mixed and assigned to two outputs (aka stereo).
Beware that some manufacturers label their mixers in a misleading manner: they count RCA or ¼-inch stereo line inputs as well as normal XLR mic inputs in their "names" or specs. Read carefully to see how many actual XLR MICROPHONE inputs the board actually has. For our purposes, these XLR MIC inputs are the only ones that count.
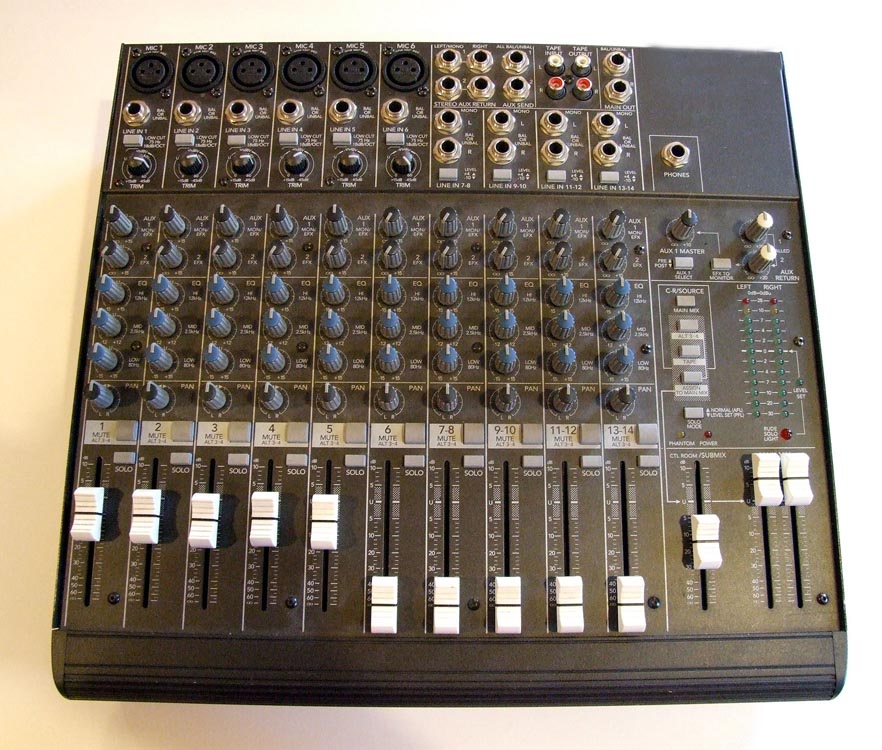
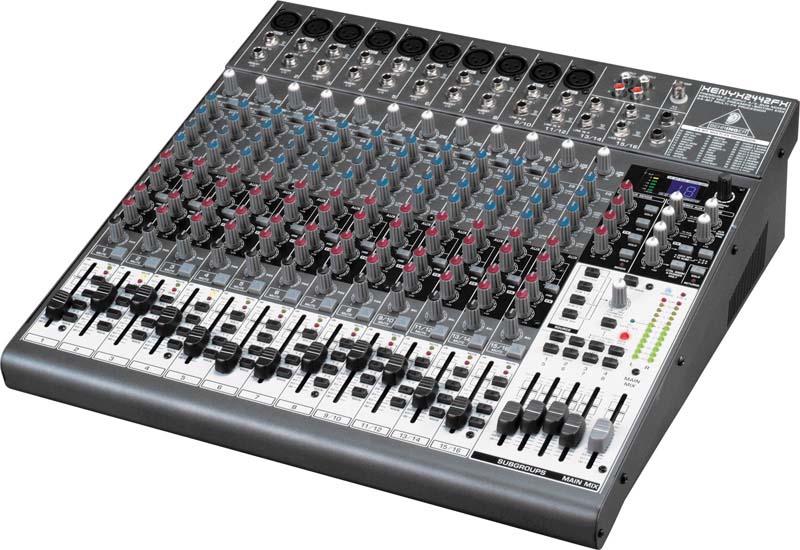
A board described as 10x4x2 would translate into ten inputs, assignable to four outputs, and also eventually assignable to just two outputs. I use a board like this, the Xenyx 2442FX manufactured by Behringer (see illustration), so that I can mix to a four-track timecode recorder on my cart (intended for the sound editor) as well as being able to send a two-track version to the camera (for dailies and picture edit).
Note that when a board is described as two output, it does not literally mean that there are only two output connectors. Most mixing boards offer two or three sets of output connectors (XLR, ¼-inch, RCA) so that you can feed multiple devices at the same time. Otherwise, just use simple "Y" cables to send an output to two devices if you need to.
Powering
The majority of inexpensive (yet professional grade) mixing panels are designed to operate from regular 117vAC wall outlet. The manufacturers made no provision for internal battery operation or external 12 volt DC, since these boards were intended for musicians. However, it is extremely rare that you would be shooting a dramatic scene or major interview on a set where there was no AC power for lights, monitors, etc.
In the event that you are in a remote location that does not have any electricity available, you can use a common 150watt inverter that converts 12v DC (cig lighter or camera battery) to AC. Spend a few more dollars and purchase a higher quality inverter designed for computers and electronic gear. The cheap models found at the auto parts stores and discount places do not put out as clean a voltage as needed for filmmaking.
Some people complain that when the mixer is run off of the inverter, a little bit of buzz & hum is detectable in the headphones. Personally, I have found that this electronic noise is only noticeable when the mic inputs are turned all the way up (with no mics attached) and the headphone volume is all the way up.
Under actual working conditions, with a mic plugged in, the noise is so low as to be undetectable. Especially in noisy exteriors, such as beaches or mountain tops.
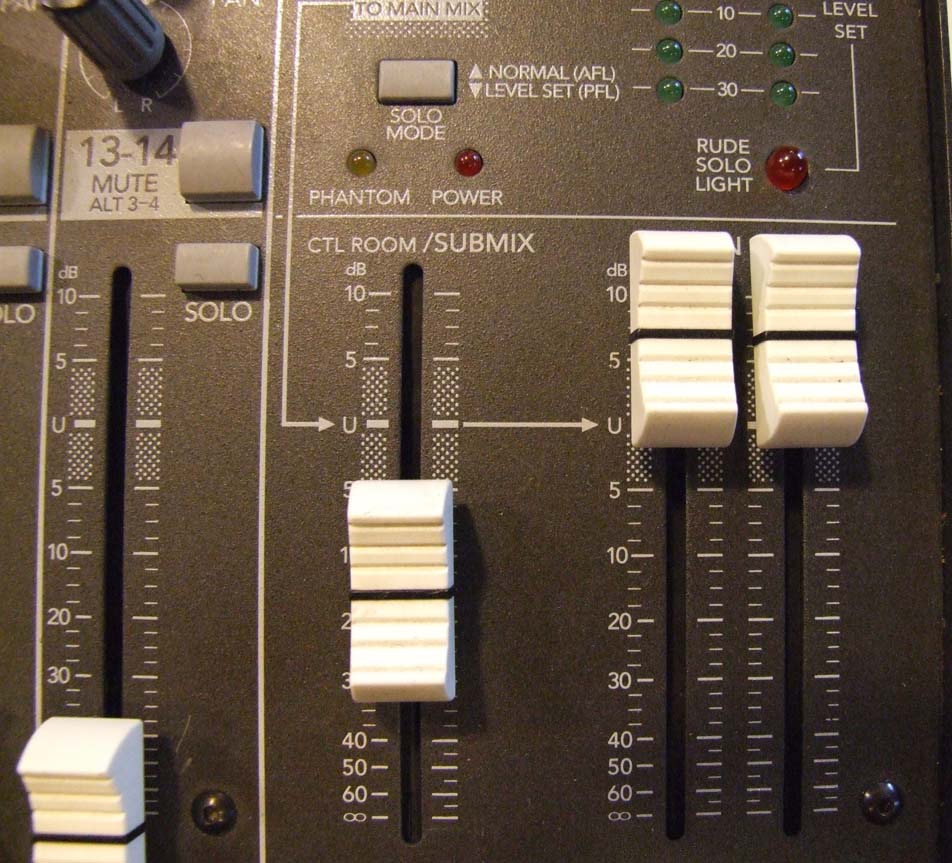
The main power switch for the mixer is on the back. Remember to turn it on. Also, remember to turn on the switch for the Phantom mic powering. You would be surprised at how many folks forget to turn both switches ON and then cannot figure out why there is no sound!
Inputs
 The board shown in our example has 6 XLR low impedance, balanced mic inputs; plus 4 more stereo/mono ¼-inch line inputs. Six mic ins are plenty for most productions.
48volt Phantom powering is available for the XLR mic inputs. A switch on the back activates Phantom powering for all 6 of the mic inputs.
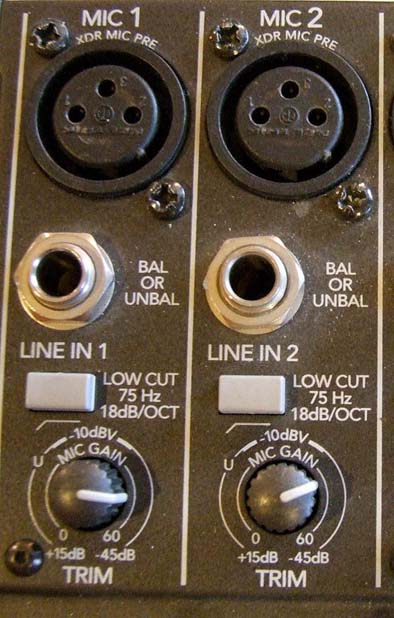
Each input module is referred to as a "channel strip". In this instance, there are six identical (XLR) monaural strips; as well as four line-level only strips.
Below each XLR mic input is a ¼-inch jack for line level input. If you have a mic with a ¼-inch plug on the end of it – you CANNOT plug it in here. These jacks are for LINE LEVEL devices, such as audio decks, that do not require pre-amps the way that microphones do.
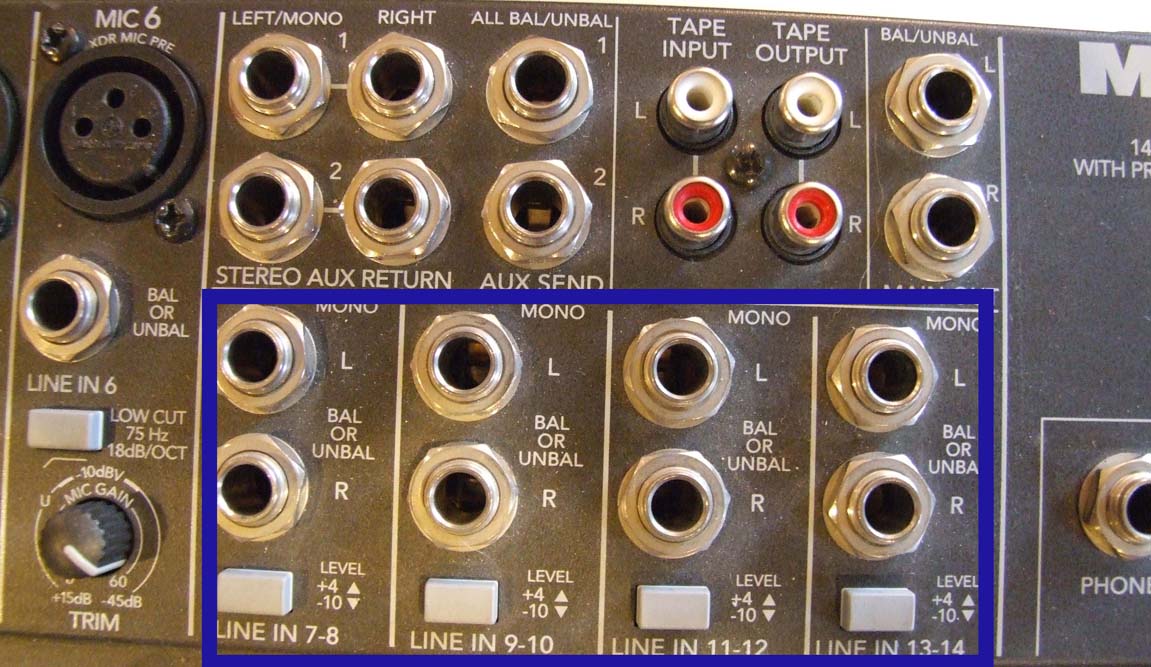
On the 4 sets of line inputs, you can plug in mono or stereo sources. A mono signal plugs in to the Left jack. A stereo source plugs into the left and right jacks, and both sides of the signal are uniformly controlled by the EQ and fader.
 Unless you are miking a panel discussion or musical variety show, you probably won't need more than six mic inputs for film/video work. The only time I have needed more inputs on a theatrical production was when I had a lot of radio mics working in addition to my wired microphones. Some radio mics give you the option of mic or line level output, so you may be able to use them in the line inputs of your board. You could also plug a tone generator into the line input of the mixer, assuming that most tone generators offer a choice of mic level or line level output.
There is a button on each strip for low cut. Using these buttons allows you to cut the low frequencies consistently, rather than dialing in a variable amount of bass cut with the equalizer controls. My recommendation is to use the low cut buttons on your mics always during exterior filming, and leave the buttons off during interiors. But if you use a panel that does not have a low cut button, use the EQ knob ¾ but be precisely consistent on where you set it, so that your takes will match from day to day.
Never adjust the low cut on a shot to shot basis to correct for the existing conditions on the set. Although it will improve the quality of that particular take (in your headphones), the audio will not match other takes shot over the duration of the production. You must be a creature of habit: use the same settings for all of your exteriors; and use the same settings for all of your interiors. It is not necessary for your exterior settings to match your interior settings, since people sound different outdoors than they do indoors.
 Each XLR input has two controls for the volume: a trim pot and a fader. The trim pot serves as a coarse adjustment, and the fader allows more subtle control. Use the trim pot to adjust for mic sensitivity and vocal intensity (whisper or loud voice).
To get ready for a take, leave the fader at the Unity position ("zero" setting, or about halfway up) and adjust the trim for an "okay, in-the-ballpark" level.
By using the individual trim pots, all of your mic inputs can be roughed out so that all of your faders go to the same height when your mics are open, eliminating the need to tape marks alongside the faders to indicate optimum setting for each actor. It sure beats the old way of having all of your faders open to varying heights and trying to keep track of them during rapid changes. By making your "home base" for the faders around halfway up, there is plenty of range for adjustment during a take for increasing or decreasing the volume of your actors.
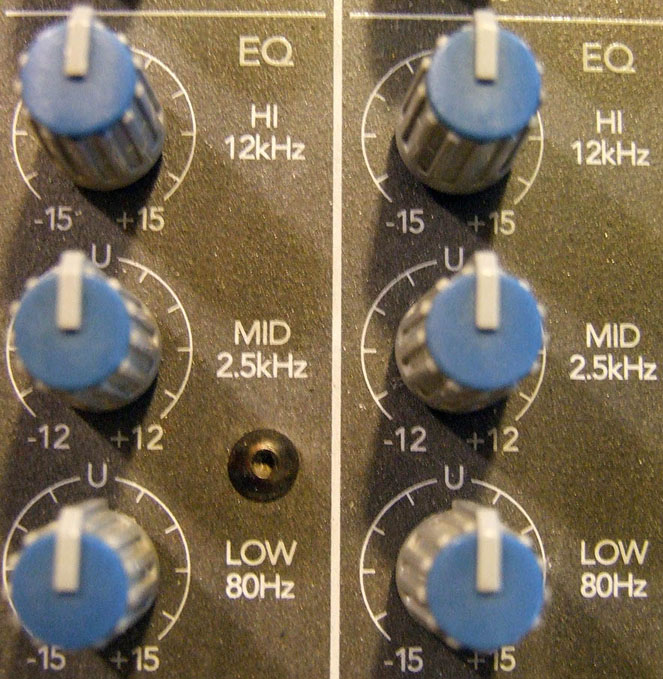
Equalization
For each input, there are 3 channels of equalization that allow you to increase/decrease low, middle, and high frequencies. Use your EQ sparingly and carefully, because you cannot undo those changes in post-production.
Low frequencies often affect noise such as wind, traffic rumble, and vibration. But it may also take the bottom end out of speech, so be careful. I like to roll off a fair amount of bass on my exterior shots, and take out just a little from interiors. If your microphone has a low-cut dip switch, that is sufficient for interiors. The low cut button on the mixer is a more consistent way of reducing bass for exteriors than using the variable EQ knob.
Middle frequencies cover most of human speech, so a slight increase of mid-range can help to improve clarity. If you choose to use a slight mid-range bump, be careful to use it consistently (in other words, all the time). Otherwise, play it safe and leave the mid-range alone.
High frequency adjustment is rarely needed. Leave it alone.
The time to employ your EQ settings is when you need to match secondary microphones to your primary mic. Do NOT use your EQ settings to just make the boom mic or main microphone sound better on a take by take basis. Instead, use your EQ controls to make other mics in the set (lavaliers, plant mics, hidden mics, a second boom mic) match the sound of your primary mic.
Let's assume that most of your show is being covered by a shotgun mic on a boompole. That makes the sound from your boom the basic tone of the dialog. That tone should be clear and natural. Almost no EQ, except for some bass roll-off during exteriors.
 In some scenes, you need to deploy additional microphones, such as a second boom, lavalier, or planted mic. Obviously, the tone of these other mics may be different from your main boom mic.
That is when you would use the EQ knobs! Try to make the other mics match the main microphone. But be careful not to overdo it.
Do that by having an actor (or crew member) speak into a secondary mic, at the same time being boomed by the main mic. Compare the audio, and make subtle adjustments to the EQ of the secondary mic so that it sounds more like the main mic. But NEVER adjust the main mic to sound like a secondary mic!
If in doubt, leave the EQ knobs alone and let the re-recording mixers fix it in the final mix. Any changes that you make in the field cannot be undone later, so only attempt what you are confident in doing.
Sometimes, and I emphasize that this happens very rarely, a qualified sound mixer will use the EQ settings to filter out an offending noise on the set. It is difficult to filter most noises out, since they usually overlap the same frequencies as dialog. Very few environmental noises are limited to a narrow frequency.
About the only time I have used extensive EQ settings to "repair" a bad set is when I knew that the audio did not have to match other audio in the film. For instance, let's say a scene takes place in the meat locker of warehouse. In order to get as clean a track as possible, over all of the resident freezer noise, I fudged around with the EQ. Aesthetically, the actors can sound different in a meat locker than they would in a normal, interior set – so I am not violating consistency. However, I do keep very detailed notes of what settings and mics I used for the meat locker scene, in case we have to re-shoot anything in there later on.
When you use the EQ to reduce a noise, you also take a slice out of the dialog, so be very careful. Only try to remove noise if the take has to stand on its own (bare bones editing; not going to a mixdown) or if the noise is so bad that the scene will probably end up being looped (so you have nothing to lose by screwing up).
To use the EQ for reducing noise, first try to isolate the frequencies by amplifying the noise. Turn the EQ knobs louder to make the noise as prominent as possible. Now you know what settings affect it. Now, turn the EQ to negative settings to minimize those offending frequencies.
Aux 1 and 2
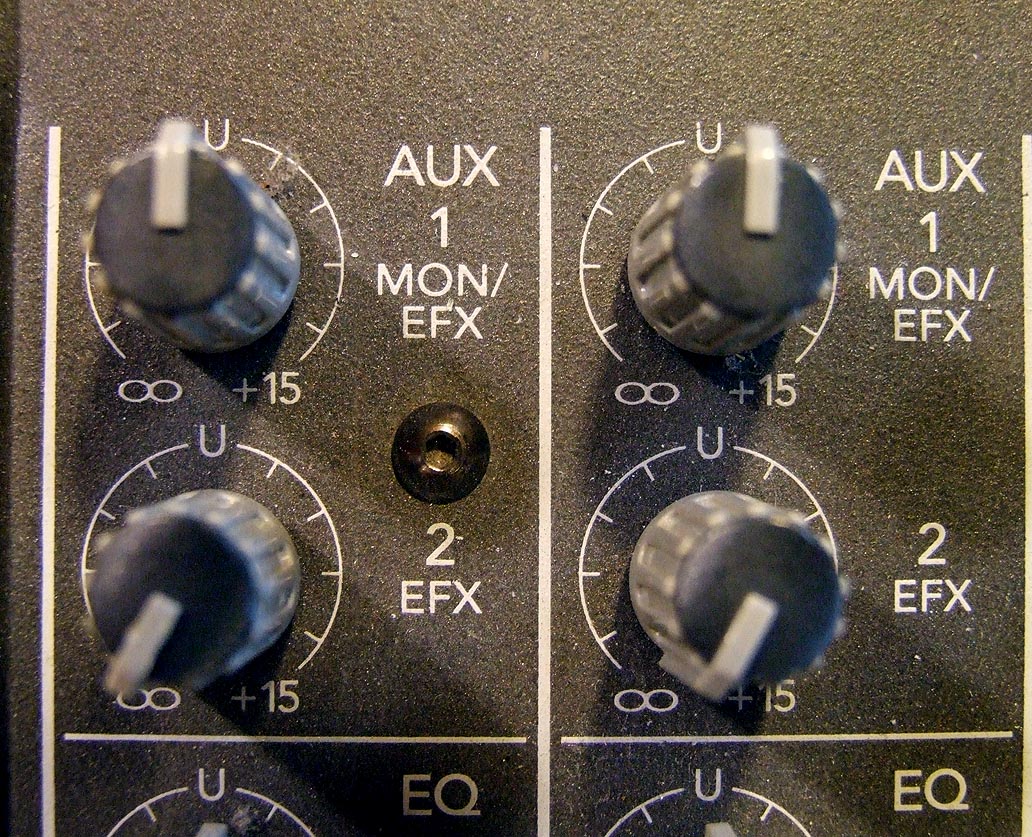 On each input strip are two knobs for Aux channels. Aux is like having a second mixing panel within your main panel. The Aux knobs determine how much signal from each input is sent to the main Aux Outputs.
Traditionally, the Aux outs are used for providing a personalized monitor send to stage musicians (minus their own mics, but with the guide tracks needed to keep them in rhythm). Aux sends can also be used to send audio to special effects devices (echo, distortion, etc.). Aux sends can also provide separate mixdowns for live audience versus recording.
Some mixing boards offer more than just two Aux Channels. Concert boards may have 16 or even 32 Aux outputs; but two to four is most common on the smaller boards that we use for filmmaking.
Your Aux controls may be labeled, or have a switch, to determine if they function as Pre-Fader or Post-Fader.
 PRE FADER means that the signal is controlled by the Aux knob and is not affected at all by the fader. It is like having two separate mix boards.
It is as if each mic were plugged into a "Y" cable, with one output going to the main mix and a separate output available to the Aux mix. Each set of controls is completely independent of the other. The main fader for the mic could be completely pulled down (in the off position) in the main mix, yet you could still send full volume out via the Aux mix.
For example, one mix could feed the PA system of an auditorium while the other mix could go out to the recorder. This would be handy when you don't want to have some mics generating loudspeaker feedback, or if some musical instruments were so loud that they didn't need to be amplified by the house speakers.
PA systems are more professionally referred to as Sound Reinforcement, because a house mixer's job is to amplify or reinforce the softer acoustic sounds in a live performance with the naturally louder sounds. For example, drums and horns are naturally loud, and would not require much amplification. But a flute or acoustic guitar would need help in order to not be completely drowned out on stage.
If you are videotaping a live event, be wary about recording the soundtrack provided directly from the "house" mixer. If they only provide you with a tap from the audience or "house" mix, you may discover that all of the loud instruments are lacking when you go to edit. Make certain that the house mixer knows the difference between giving you a complete mixdown (intended for recording) versus sound reinforcement for the audience live mix.
POST FADER means that the Aux knob takes effect after the signal has been controlled by the fader. If the fader were closed, then no signal would go to the Aux. The Aux output reflects any changes in volume made by the faders. But if the fader was open, and the Aux was closed, then no signal would go to the Aux output.
POST FADER Aux is used during production as a convenient way to send audio to the boom operator. Or to provide a monitor feed, say, to a viewing room.
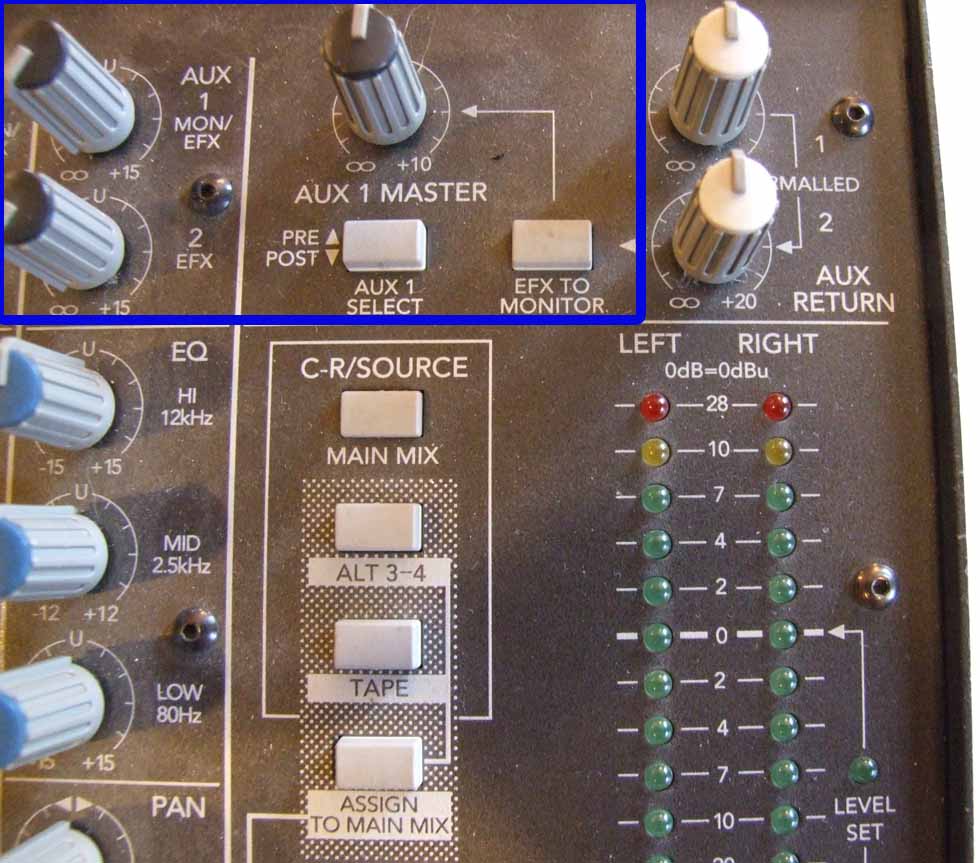
For example, the output of all of the Aux 1 knobs is controlled by the Aux 1 Master knob. Use the Aux Master to control the volume of the boomperson's headphones.
If you have a tone generator plugged in to one of your inputs, then turn the Aux 1 knob down on that input so it won't blast the ears of your boom operator.
Audio to the Boom Operator
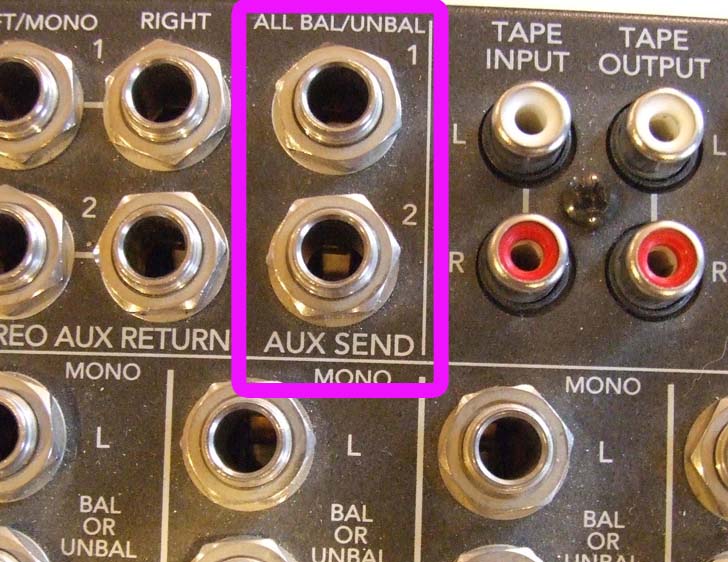 In this example, we plug the output for the boomperson's headphones into the main Aux Send 1, which is a ¼-inch jack. Use a ¼-plug to XLR male adapter cable, and then run an XLR mic cable back to the boom operator. At the boom operator's end, there is a ¼-inch jack to XLR female adapter (or belt box), to accommodate headphones.
Usually, the ¼-inch Aux Output jack is wired for monaural. You may need a simple mono-stereo adapter so that the boomperson is able to hear in both sides of the headphones.
Note that on some mixing panels, you might use Aux 2 for the boomperson -- if Aux 2 is normally preset for Post Fader and Aux 1 for Pre Fader. It varies depending on what make and model board you use.
Some of the more expensive boards even offer a dedicated output with volume control for the boomperson.
If you are not sure whether or not an Aux output is set to pre or post fader, it is simple enough to determine. Just plug your headphones into the Aux output jack, and then slide down the mix fader. If you hear the decrease in your headphones, you are plugged into Post Fader. But if the mic does not change even though you adjusted the fader, then you are listening to Pre Fader.
On a professional set, we use a custom duplex cable that does the same thing in a neater package. At the mixer end are two XLR connectors -- one to carry the audio from the boompole and another to send a headphone feed back to the boomperson. Both audio lines are packaged in a single housing, so there is only one physical cable linking the boom to the mixer. At the boom operator's end there is a breakout box that includes an XLR female connector (for the boom mic) and a headphone jack. Some boxes even have a volume control for the headphones. These cables are anywhere from 50 to 100 feet long, with 75 being the most popular length.
It is also possible to use a radio mic or wireless assistive listening device to transmit audio back to the boom operator.
If the sound mixer is monitoring out of a backup digital recorder, then you could plug the boom operator into the regular headphone jack of the mix panel.
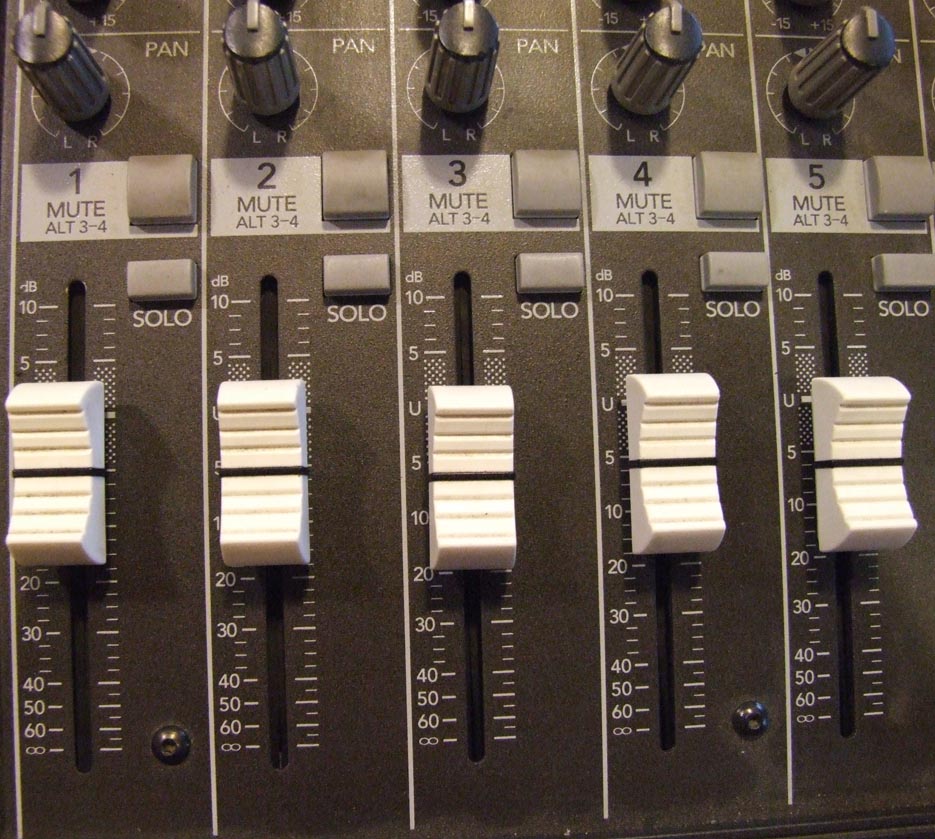
Pan
The last knob on the input strip is the Pan pot, which sends the signal to the left, right, or anywhere in between. Use it to assign the input signal to a specific track if you are recording in stereo (2-track).
 If you are only recording in monaural, in other words, only sending one audio track to your camera, then leave the PAN pot in the center. That way, the exact same audio will be assigned and output to the Left and Right tracks of your mixer, and you can hear in both sides of your headphones.
If you are recording onto a 2-track recorder, then it is better to assign your inputs to complete left or right, but not a centered mix of both at the same time. Otherwise, you cannot deal with the 2 audio tracks separately during post.
Forget the terms 'left" and 'right". They only exist for the post-production mix. Instead, think of your mixer as being able to output two DIFFERENT monaural feeds, so that your editor has the most flexibility in cutting tracks. Later on, those tracks will be re-mixed or assigned to left and right (or more likely, to 5.1 which is: Center, Front Left, Front Right, Surround Left, Surround Right, and Sub-woofer).
Remember back at the beginning of this article when we mentioned the stereo line level input strips? This is the time to explain them. For starters, there is no mic pre-amp (trim pot). The only control for setting the ballpark level is a button that lets you adjust the line level sensitivity from professional plus 4 to prosumer minus 10. Both are "line level" signals; but plus 4 is somewhat hotter than minus 10. Just try the button either way and go with whatever gets you a decent volume (the wrong setting would be either way too strong or way too weak).
If you had one line level source plugged in to a strip, then the pan control would work similar to that on a monaural (XLR) strip. It would route the audio to track one, track two, or anywhere in between.
When you plug two line level sources into one of these "stereo strips," the strip detects the presence of both plugs and changes into a 'stereo" mode. Any volume and EQ settings affect both input signals (such as the left and right sides of a music track). The pan knob changes into a 'volume balance" control that lets you make one side louder or softer than the other, but does not pan the sound from one side to another.
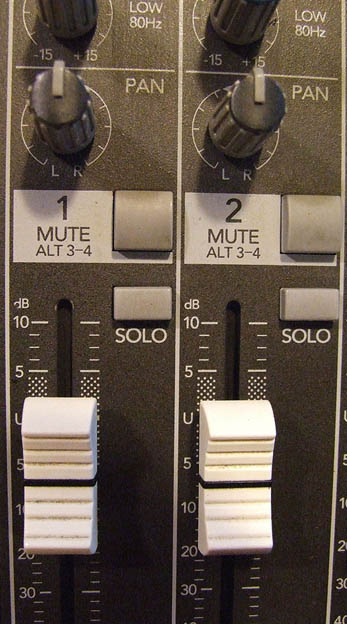
Mute
Mute 'kills" the audio of an input and removes it from the main outputs. In the case of some mixers, it actually re-routes the audio to another set of outputs, labeled Alt 3 &4, so that you can still record these signals onto a four-track recorder. Comes in handy if you want to record scratch tracks, interview questions, or other material that you prefer to keep out of your main mix.
The drawback to using Alt 3 & 4 is that once they are set, it is not convenient to ride herd on them during a take. So I tend to use them for 'disposable" information.
But after you master the use of your mixing board, you may find interesting ways of using these extra two outputs.
Solo
Depressing the solo button allows you to monitor only the selected input in your headphones. This is very useful for troubleshooting and checking mics.
Pre fade listen (PFL) means that you can listen to an input even if the fader is completely closed. It is good for cueing up a playback, or checking on a microphone.
Headphone Monitoring
Stereo headphones plug in to the phones jack of the panel. Only use a "Y" cable to connect two pair of headphones if both headphones are identical make and model, since audio quality for the sound mixer is critical and could suffer if two pair of headphones have differing impedance.
It is extremely important to set the headphones to proper listening level, since that is the preferred means of judging the relative volume of the mix. If the headphones are too loud, the soundperson will tend to under-record the mics. If the headphones are set too low, the mix will be too loud and will distort in the camera.
Good dialogue should sound pleasant and be right in the middle of your listening comfort zone. A loud shout or exclamation should be uncomfortable (but not painful). When your headphones are set correctly to your hearing, you won't even need to think about adjusting levels to make the meter happy; your hands will just do it automatically to please your ears!
 If you use a tone generator (and I strongly recommend that if your board does not have a built-in tone generator, that you buy one), set the tone so that your meter reads zero. Adjust the volume of your headphones (not the meter settings) so that the tone is just on the outer fringe of your comfort zone. Sort of like a bad phone call where you want to move the handset a short distance from your ear!
At the same time, send and record a zero tone from your mixing board to the backup digital recorder and/or camera. Zero on a VU meter from your mixer equates to around minus 20 on a digital audio recorder, and minus something on the camera. (Camcorders rarely have proper audio meters calibrated in dB, so you will have to experiment to find the right input level.)
If you are using a professional grade backup recorder, then the sound mixer should monitor directly out of the recorder whenever possible, in case something happens to the signal after it leaves the panel. Connections may get undone, radio stations can cause interference, recording levels get accidentally changed at the recorder, and so on.
Make sure that the camera operator or assistant is carefully monitoring the audio in the camera. Gently rub the windscreen of one of your mics before each take to make sure that the audio in the camera is from your mixing board and not defaulting to a camera mounted mic. It happens more than you can imagine!
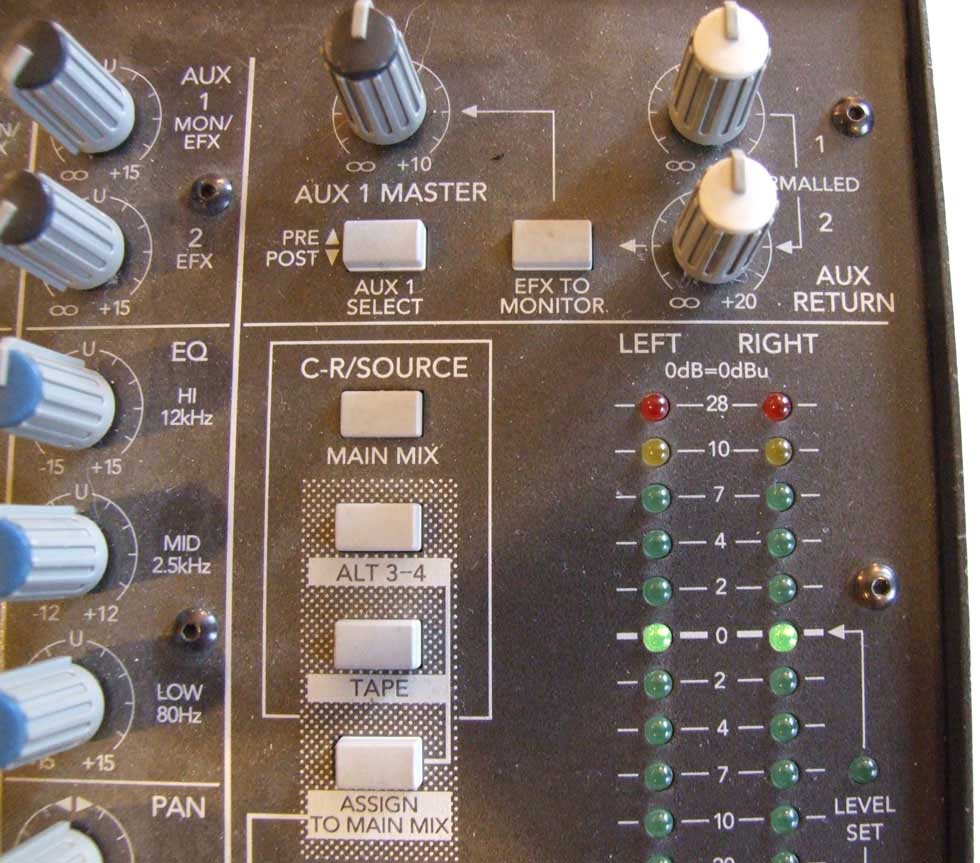
It is possible to monitor the recorder FROM the mix panel by bringing a return audio signal into the TAPE IN jacks (RCA connectors). There are buttons that allow the headphones (and Control Room jacks) to monitor the Main Mix (standard setting), Alt 3-4 (the mute buttons), or TAPE (return from recorder, or an additional line input source).
Normally, we would leave the C-R Source buttons for Alt 3-4 and Tape de-selected and NOT assigned to Main Mix (also de-selected). We DO select as our C-R Source the Main Mix (top button shown in the example). This means that the audio going out to our Main Mix is being monitored in the headphones (and Control Room Outputs) and also is being measured by the LED meters. If we de-selected Main Mix, then we would not hear anything in our phones nor see anything on the meters.
Alt 3-4 and/or TAPE (when this is a fresh source and NOT the return audio from the recorder) can be added to the Main Mix by selecting their respective buttons, and then selecting Assign to Main Mix, but that is for more advanced applications and not recommended for the novice.
Audio for Director, Script, and Others
It is a common practice to provide audio to key people on the set in addition to your boom operator. Use some sort of wireless system in order to avoid cable confusion. Besides, it is highly unlikely for your Director to stay in one spot very long!
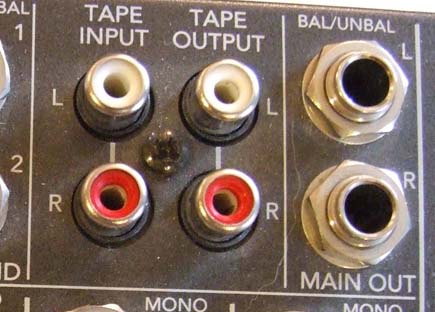 The wireless can be fed from the TAPE OUT (RCA jacks), Control Room outs, Main outs (you have XLR's on the back as well as ¼-inch on the top), or Aux Send. Lots of choices…
Output to the Recorder
As mentioned above, there are numerous ways of getting signals out of the mix board. The best method is to use the XLR balanced outputs on the back of the board.
Some mixing boards offer a choice of line level output or mix level output. Whenever possible, use the line level output rather than the diminutive mic level option, since it takes a lot stronger signal to cause interference at line level.
However, if your camcorder only accepts external MIC input, then be sure to depress the button near the XLR outs that will reduce the outgoing signal from line to mic.
Most mixing panels only offer line level outputs. In the event that your camera only has a mic level input, you will need special audio adapters or adapter boxes to convert your line level output to a mic level camera input.
The TAPE outs are convenient unbalanced RCA outputs, and may be convenient for some applications.
Metering
The LED meter on some of the popular mixing panels are more of a peak reading meter, than a typical VU meter as found on most other brands of lower end (music or PA) mix boards.
On a typical VU meter, average settings are at zero. Peaks in the soundtrack could be up to +10 VU. But on a peak reading meter, zero is considered the limit; with average levels being somewhat under.Â
The most important thing is to check where your output levels play on the recorder's meter. If a solid signal on the mixer's meter shows as too hot (or too low) on the recorder, then simply re-adjust the line level input knob of the recording device!
This "look and see" (record and play back) approach applies especially to video camcorders.
All meters read and react differently to dialog, so don't be so rigid in your ways that you fail to compensate. The only meter that really matters is the Recorder's!
Develop a consistent work habit in how you monitor both in your headphones as well as visually on the meter. Then experiment to see how your mixing panel settings best translate over to your recorders.
Some folks naturally mix a little hotter than others; and may find that they need to "tone up" with zero on their mixers going to a lower setting on the recorders. Or not.
 But do not ASSUME that the settings that work best for one person or one recorder will always work with others. Take a moment and do some experimentation.
In an emergency, a trick that I find works well enough is to compare the settings of the camera's automatic gain control with manual settings.
Auto Gain Control is notorious for pumping. The circuit is programmed to record average dialogue at average settings. But if the dialogue should exceed average levels (such as a shout), the circuit wants to lower the volume. If the dialogue should taper off to a whisper, then the circuit wants to raise it back to normal. And if the dialogue vanishes (a long pause), then the circuit tries to find ANY sounds or noise and raise them to dialogue level!
Not exactly a good thing. Which is why we do not normally deploy the Automatic Gain Control.
But we can fool it into telling us what level the manufacturer felt would be ideal for normal dialogue on their camera.
Have someone speak into a mic and just read a script or a newspaper. No shouts, no whispers, no pauses. Nothing that would upset the Auto Gain Control.
Mix it on the panel at your normal setting for plain dialogue. Probably a couple of notches (LEDs) under zero.
Send that audio to the camera and note the range on the camera audio meter that the Automatic Gain circuit puts the dialogue. Then, turn the camera back to Manual Audio and dial in the dialogue so that it is in approximately the same range.
Now, use your tone generator and send zero tone out of your mixer into the camera, and make a note of where the tone appears on the camera's meter.
In conclusion
Although mixing panels appear intimidating at first glance, they are really not all that complicated to operate. They afford smooth control over each mic or line input; provide a source of 48v Phantom mic powering; and allow us to blend multiple signals together as well as to assign those sounds to any of our available soundtracks.
Mixing panels facilitate monitoring of the sound tracks by talent (musicians, on-air reporters), the boom operator, Director, Client, or whoever.
The Aux Outs let us provide different versions of the mix for live audience listening as well as full recording.
Mixing panels are relatively inexpensive to purchase.
And they really look professional. Because they are.
This article was originally published by Student Filmmaker Magazine.