Part 2: Recording without a mixing panel
This section of the guide will explain how to record audio directly into the recorder, stand alone, without a mixing device.
It is assumed that you have already performed the basic setup tasks to the recorder as described in
Part 1, and have created a Project and Scene folder.
XLR Inputs
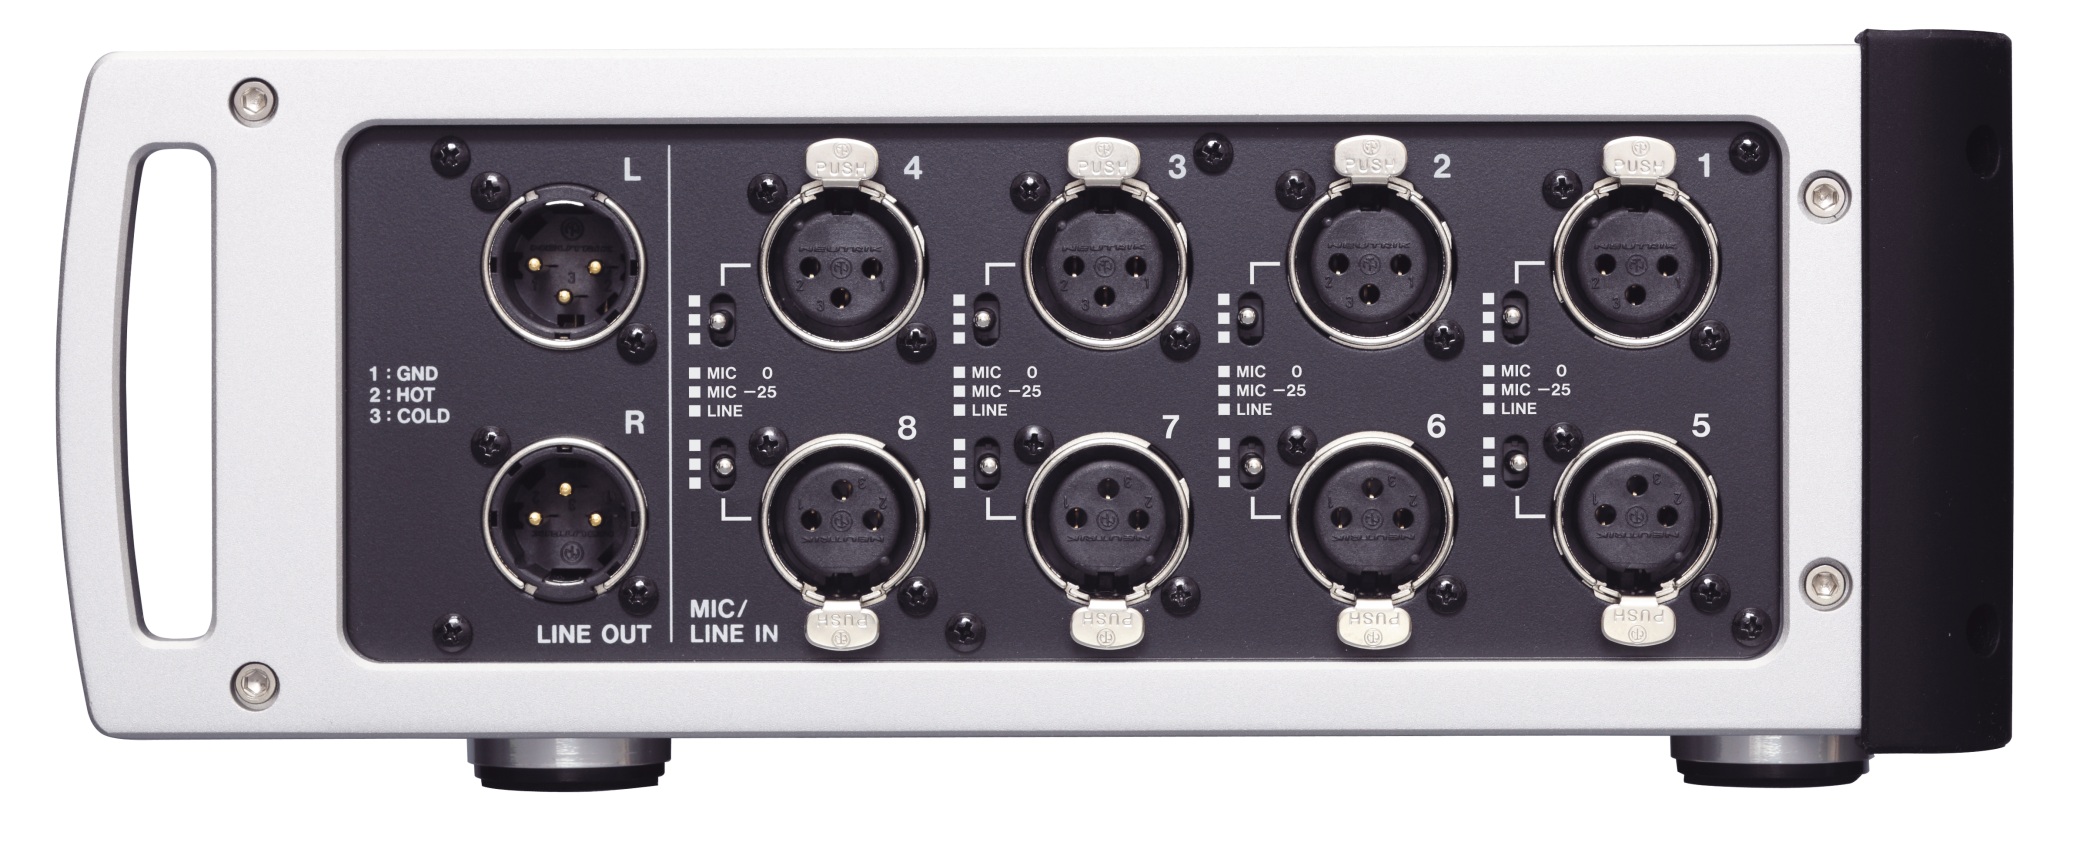 On the right side of the Tascam are 8 XLR inputs and two XLR line level outputs. Plug your source devices into the inputs 1-8. Alongside each input is a physical switch to select normal mic level; strongly attenuated mic level (-25dB); or line level. Use the attenuated mic level if your microphone is putting out very high volume, such as from some hot condenser mics, or from very loud sources.
If your input device is at line level, but you feel that the feed is still a bit on the low side according to your meters, you can adjust the line level overall sensitivity by going to the SYSTEM SETUP screen in the MENU, and changing the REF LEVEL.
Channel Setup
As described in Part 1, go to the Channel Setup screen in the MENU section. Select the appropriate parameters for each input channel that you are using, such as Phantom on/off, and so on. At this stage, you do NOT need to worry about arming the track, nor adjusting the pan and output levels. Those tasks can be done from the HOME screen later on.
 HOME screen
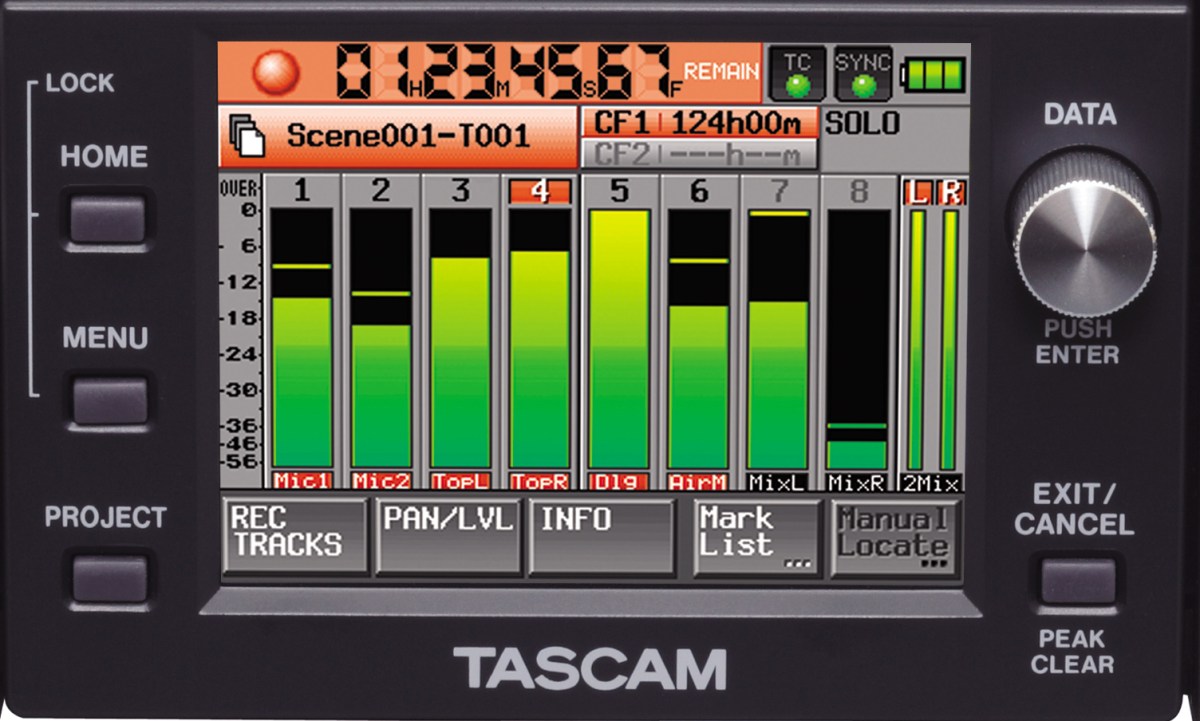
As you might imagine, the HOME screen is where most of your recording activity will take place. The root HOME screen shows meters for input channels 1-8 as well as the LR master mixdown.
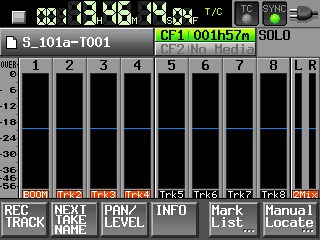 The REC TRACK tab allows you to arm/disarm any track for recording. It also allows you to name and number each successive Take. Tracks that are armed for recording will display with red track names.
You can name each take by pressing the edit button. Most soundmixers just use the prefix “T” for take, just as we use the prefix “S” for scene and “P” for project. But you are able to use any naming convention that you want.
You can also enter the starting number for the next take. Generally, this would be “1”. But if you are going back to a previous scene, you may need to enter a later number.
Each time that you hit RECORD, and then STOP on the recorder physical controls – the take number will automatically increment.
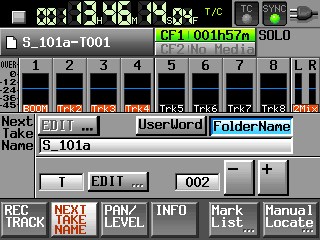 Another way to edit the NEXT TAKE NAME is from the tab of that label. When you access the take name from its own tab, you cannot accidently arm/disarm an input channel. Otherwise, the screen is similar. Use whatever screen you feel comfortable with.
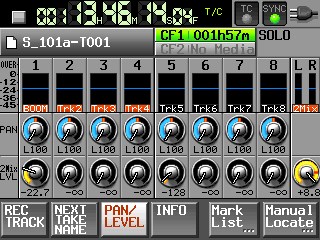 The PAN LEVEL tab is where you would normally access the OUTPUT LEVEL to the Master L/R tracks, and PAN controls for each input channel. Pressing the virtual knob will link it to the physical DATA knob on the recorder. An advantage of using this screen instead of the Channel Setup screen for these functions is that the PAN LEVEL screen shows meters for each channel as well as the master LR mix.
To return to the root HOME screen at any time, you can either untap the tab or just press the HOME button.
Solo mode
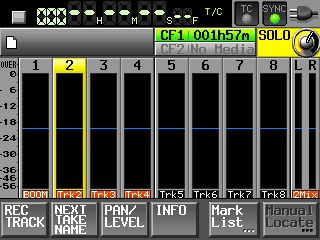 If you press on the meter display of any input channel, it will turn yellow, indicating that you are now in the SOLO monitoring mode. This allows you to listen to any individual channel, rather than to the master LR mix. Note that when solo is lit up, a virtual solo volume control appears in the upper right of the screen. It will vanish when you exit the solo mode.
The default setting for SOLO, in the System Setup screen, is SINGLE. That means only one channel at a time can be solo monitored. If you change the solo mode to MIX, then it is possible to highlight and monitor as many channels simultaneously as you want to. MIX is more versatile for film/video applications.
Setting your recording levels
Plug your source XLR’s into the recorder. The input level (gain) for each channel is adjusted by the 8 physical knobs to the left of the display.
Note that the knob will have no effect on a line level input. To adjust a line level source, you must either increase the output level at the source, or select a different REF LEVEL from the Setup screen.
Use the individual knobs to bring each microphone volume to an optimum level on its meter. For most film/video applications, that would be approximately -20dB or -18dB. This level allows for plenty of headroom in the event of a loud exclamation or sound effect. In the world of digital audio recording, you never want to exceed zero!
After you have set the input levels (referred to as “trim” by the audio industry), the next step is to set the PAN and OUTPUT LEVELS.
Select the PAN LEVEL tab at the bottom of the HOME root screen. Using the virtual knobs, assign each input to L100 (aka 100% left) or R100 (aka 100% right), if you are recording dialogue for film/video.
Select the 2Mix knob and raise the output level to where you want it in the master mix.
Because the Tascam always remembers the last control that you have highlighted, a good technique for setting the mix level is to return to the HOME root screen and adjust the output level while watching the larger meter displays.
You are now ready to record.
Recording on the HS-P82
 To begin recording, depress the physical button on the right of the display marked RECORD. To end recording, press STOP.
To record the next take, just press RECORD again. The take number automatically increments.
To playback a take, just press PLAY. To go back to a prior take, or advance to a later take, just press the << BACK or FORWARD>> buttons.
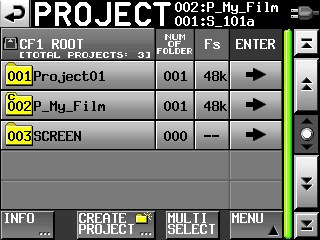
If you need to search for a very distant take, either press the scene/take label box just above the meters, or the PROJECT button. Both will take you to the Project screen, where you will see an index of scenes & takes. Pressing the ENTER arrow button adjacent to the desired take will “load” that take into the current location. Then just use the PLAY keys.
When it is time to roll sound for a new take, just press RECORD. The take number will automatically increment to the correct number, regardless of the fact that you just played back an early take of that same scene.
If you loaded a different scene to play back than the current one, when you press RECORD it will increment to a new take number of the (just loaded) scene. So in that case, you would want to return to the correct scene before going into RECORD. Go back to the index, and select any take from the scene that you need to be in. Press enter to load it. Now you are ready to record the next take.
Head tone and header ID
Before recording any actual film takes, you should always record a header file. That file should consist of the soundmixer reading the basic production information into the slate mic.
Go to the PROJECT button and select the MAKE FOLDER tab. Name this (scene) HEADER-TONE or something similar.
Go to the System Setup screen and select INT MIC for slate type. Press RECORD and speak the following information while depressing the slate button.
- Production Title and Number
- Date
- Name of the soundmixer
- Location
- The following is being recorded with 8 tracks of iso and a 2-track Production mixdown on the Tascam HS-P82 digital recorder at 16bit, 48K (or whatever your format is) at 23.976 timecode (or whatever your timecode rate is).
- The following reference tone will be 30 seconds recorded at negative 20dB (or whatever your headtone reference level is).
Press STOP. Go to the System Setup screen and change the INT MIC to TONE. Note: The RC-F82 allows you to program "Slate (MIC)" and "Slate (TONE)" to the Function keys, so that gives you a way to get quick access to these rather than have to go to the system setup screen every time.
Press RECORD and use the slate button to generate TONE. Capture 30 seconds of continuous tone.
Remember to go back to the PROJECT screen and select or create an appropriate scene, and load it. You do not want to record normal takes while in the HEADER-TONE scene.
New Take, New Scene
As explained before, the take numbers will increment automatically every time you RECORD and STOP. In addition, you can manually change the number for the next take by using the tab at the bottom of the root HOME screen.
 To change to a new SCENE number, you need to remember that Tascam uses the term FOLDER instead of scene.
Go to the PROJECT screen either by pressing the scene/take box just above the meters on the HOME screen, or by pressing the PROJECT button. Then, just press the name of your project, and the screen will advance to display all of the scenes within it. You will see the MAKE FOLDER tab at the bottom of the screen.
Select the MAKE FOLDER tab, and type in the new scene number, such as S_002D (or whatever).