Enable the Record Tracks
 Before you can record to any tracks, you must manually “arm” them, that is, enable them ready for recording. Otherwise, tracks are locked out and will NOT record.
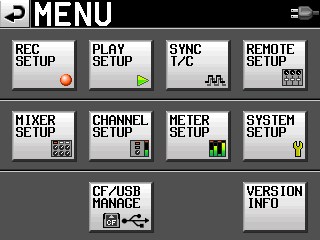
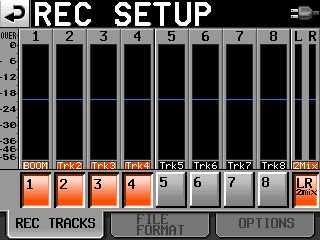 From the MENU button, select the REC SETUP screen. From the REC TRACKS tab at the bottom of your screen, simply press each of the tracks that you wish enabled. Don’t forget to also enable the LR 2mix button on the end, which is the master track that you can mix all of the other tracks down to, in addition to recording them as individual iso’s.
Note that you can also enable/disable record tracks from the HOME screen, as well. Just select the REC TRACK tab at the bottom of the screen. This is where you would normally access the tracks during a production session, after the initial setting up.
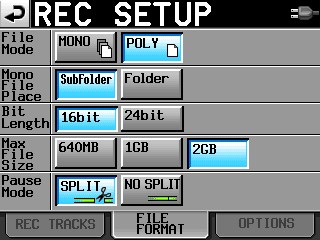 The FILE FORMAT tab allows you to select mono (default)or poly formats for your tracks, the bit rate (16 or 24), mono file placement (subfolder is the default), max file size (2GB is default), and whether the file is split (default) or stays intact when you hit the pause button.
Important note: the default bit rate for the Tascam is 24 bit, which would be correct for music. However, for film/video, the 16 bit setting is more prevalent – but some productions do use 24 bit. Always ASK the Post Production Supervisor what settings they require!
The OPTIONS tab is where you will find the capability of enabling the PRE RECORD function. The default setting is OFF, but there are some field applications where it is extremely useful to be able to record audio that occurred a few seconds BEFORE you pressed the RECORD button!
Meter Setup
From the MENU button, select Meter Setup. You normally should not need to make adjustments to this window. The default settings are: Peak Hold 1 sec, Release Time Normal, Over Level –0.20 dB, Ref Level Line On.
Mixer Setup
From the MENU button, select Mixer Setup.
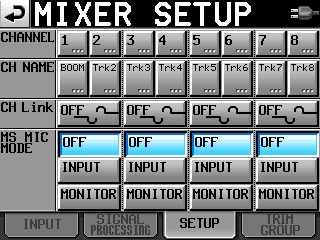 Start with the Setup tab.
You can assign a name to any track for your convenience. For example, you could rename Track 1 as “Boom”
Channel Link is for linking a stereo microphone so that one set of controls spans over two input channels. MS Mic mode is for when you are recording unprocessed mid-side tracks with an M-S type mic.
The TRIM GROUP tab allows you to link the gain level of any input so that one track controller knob is master over the group. For most film/video production, you would not use this feature.
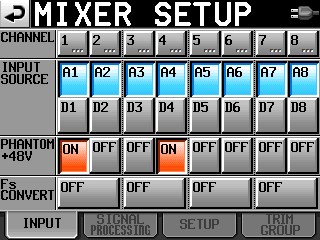 The INPUT tab lets you select analog or digital input for each channel. If you are bringing in digital sources, the Fs CONVERT button allows you to turn on a sampling rate converter. You can also activate PHANTOM mic powering for each input.
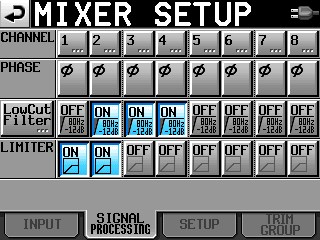 The SIGNAL PROCESSING tab allows you to reverse the acoustic phase of a given channel, to engage a low cut filter, or to engage a limiter. You can dial in the variables for the low cut settings for each channel by pressing the main LowCut Filter button on the left of the screen.
Channel Setup
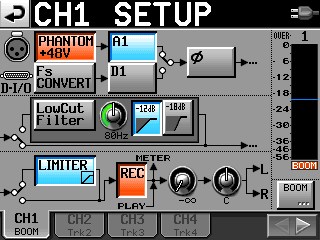 From the MENU button, select the Channel Setup window. The Channel Setup window is a fast and convenient way to control the settings for each input channel, and is the best way to work with your channel settings during a session.
The screen of the Channel setup window shows tabs for input channels 1-4. Selecting the arrow tab on the right will bring up channels 5-8, and vice versa.
For each channel, you can turn Phantom power on/off; select analog or digital input; engage the phase reversing tool; engage low cut & adjust the low cut parameters; and engage limiter. The button marked “REC” will arm or disable the track.
Pressing on the small knob located next to the REC button will activate the (real) knob on the Tascam located to the right of the display, marked DATA. That virtual knob on the screen controls the output level from the channel to the LR master mix, and is linked to the physical DATA knob on the Tascam.
Next to the virtual output level knob is another virtual knob marked >L/>R. When this virtual knob is depressed, it becomes linked to the DATA knob. It is the pan control for the output, and determines the stereo mix to the master left and right tracks.
Note that for film/video production, we very seldom want to create a (seemingly) screen balanced, stereo 2-track master for the editor to work with. Instead, fully pan (assign) your input channels to 100% all the way left, or all the way right, so that there is no overlap of audio onto both tracks. During the editing process, a hard left or hard right set of dailies can be panned to screen center as the editor desires. But starting out with two discreet tracks will give the editor more options and better control. Remember that the eight individual iso tracks often will not be utilized until after the picture edit is locked, and the workflow goes to audio post production.
On the lower right of the Channel Setup window is a button with the trackname or label, just under the level meter. Pressing that button allows you to instantly rename the track display to something more meaningful, such as changing “Track 2” to “Boom”, or “Track 5” to “Brad”.
Updating the Firmware Version
One of the best features of the Tascam PS-82 is the ability to update your firmware to the latest version. The engineers are continually improving on the basic design, and adding new features as well as shortcuts to simplify the workflow.
When you download a firmware update from Tascam to your computer, it will be in the form of a zipped file. Extract and save the uncompressed version of the file to your hard drive. Then, copy and paste the uncompressed file to the root file of your compact flash card.
If your computer cannot read compact flash cards directly from one of its existing card reader slots, then buy yourself an external card reader at your local computer store. You will need it for copying dailies on the set, anyway.
With your recorder powered OFF, insert the compact flash card into slot 1. Depress the PAUSE and RECORD buttons simultaneously, while you power up the unit. The display screen should show the firmware version that it found on the CF card, and ask you if you want to upload it. If you have a collection of firmware versions on a CF card (I store a copy of all of my firmware on a small CF card that I do not use for audio recording), then it will allow you to select which firmware to load.