Part 4: Recording with the Tascam RC-F82 Fader Unit
An excellent alternative to the use of an external mixing panel is to use Tascam’s companion RC-F82 remote Fader Unit.
 The F82 is technically not a mixing panel; it is a remote controller for the recorder. That being said, for all intents and purposes, it serves the purpose of a mixing panel for our application!
The unit allows us to control up to eight inputs and mix them down to the two master LR tracks of the Tascam recorder. The fader controller offers a choice of using the sliders to adjust the trim/gain of each input, or to control the output to the LR tracks. A dedicated knob for each input module is also assignable.
For film/video applications, most soundmixers prefer to utilize the sliders for the output to the master LR tracks, and the rotary knob for adjusting the basic trim/gain of the input – as it would be on a conventional mixing board.
This compact accessory has the same footprint (dimensions) as the recorder, thus making it ideal for use where space is at a premium, such as on a smaller production cart, or even in a camera car.
Whereas an external mixing panel would take up one (or two) of our eight available input channels of the recorder in order to record the live production mix, the Fader Unit allows complete control over each input channel when mixing down to the LR master tracks. That results in 8 iso tracks, rather than only 6 or 7.
The downside is that there are only 8 inputs total, so we are limited to no more than 8 mics on the set. But for the overwhelming majority of projects, 8 mics is more than sufficient.
Connecting the RC-F82 to the recorder
Cables required:
- PS/2 male to PS/2 male jumper cable (supplied)
- ¼-inch stereo plug to ¼-inch stereo plug headphone jumper cable (supplied)
- XLR 3-pin male to XLR 3-pin female short microphone cable (two, user provided)
The Fader unit draws its power from the PS/2 cable that connects it to the main recorder. Make sure that the recorder is powered OFF before you connect the devices! Connect the cable from the KEYBOARD socket on the recorder to the MAIN UNIT socket on the controller. Should you need to plug in a keyboard to the setup, there is a KEYBOARD socket provided on the controller.
(Since the touchscreen provides easy data entry, most soundmixers do not see the need for an external keyboard. But the option is there for you if you want to use one.)
Next, you will want to connect the headphone out jack from the recorder to the headphones in jack on the back panel of the Fader unit.
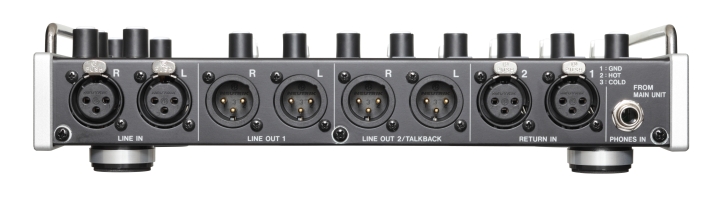 Finally, connect the two XLR line outputs on the side of the recorder to the XLR line inputs marked LINE IN on the back of the Fader unit.
Connecting the RC-F82 to your Boom Operator
To begin with, you will need either a professional duplex “boom operator” cable (equipped with a female XLR headphone feed at the panel end, and standard headphone jack at the operator’s end); or a standard XLR mic cable equipped with an XLR to ¼ headphone jack adapter at the other end.
If you are mixing down to a monaural master LR track, you can plug your boom operator(s) into either the left or right output marked LINE OUT2/TALKBACK.
If you are mxing down to a 2-track or stereo master, then you would require a custom adapter or Y-cable to merge the L-R outputs into one combined mono feed. For most film/video applications recorded with multi-track iso’s, it is customary to only provide a monaural mixdown for dailies and picture edit, so this is normally not an issue. But if it is, then have a technician build you an appropriate adapter.
In the event that your output to the boom operator results in audio only coming out of one side of the headphones, then just use a simple ¼-mono to ¼-inch stereo headphone adapter to solve the problem for the meantime, until a technician can permanently rewire the boom cable.
If your boom operator(s) need to communicate directly to the soundmixer, their talkback mics can be plugged in to the XLR inputs marked RETURN IN on the back of the Fader unit.
Output to the Boom operator is at line output. You may want to add some sort of inline volume control or switchable attenuator (such as a -10, -20, -30 pad) if your boom operator prefers to monitor at lower volume.
Communicating to your Boom Operator
 Located directly beneath the label that reads TALKBACK is a button and a sliding switch. When the switch is in the OFF position, it means that audio from the live mix is feeding out to the Boom Operator. When the switch is moved to the ON position, it blocks the program audio and replaces it completely with your talkback mic. Pressing the button activates the built-in microphone located in the upper right hand corner of the Fader unit, just above the module for Channel 8.
Another way to address your Boom Operator is to use the slate mic located on the recorder itself. Be aware, however, that any audio from the slate mic goes onto all of the tracks and would be recorded.
In the upper right hand corner of the Fader unit is a section labeled RETURN IN. These pots control the mix of program audio versus return audio from the boom operator’s personal mic. The SOLO buttons allow the soundmixer to only hear the communication, without the distraction of the program audio.
Soundmixer’s Headphones
The section labeled PHONES controls the main headphone feed coming out of the PHONES jack located at the left front of the Fader unit.
Master volume for the headphones is controlled by the headphone volume knob on the RECORDER. This signal passes into the Fader unit, where the volume can be re-adjusted by the phones volume knob on the Fader unit. Once you understand this signal flow, you can see how it could be utilized to split the headphones feed at the recorder (say, for example, to transmit program audio to the Director or Script Supervisor on the set), and then still have capability of re-adjusting the volume for the comfort of the soundmixer.
The two MONO buttons allow you to monitor the Left or Right master tracks in mono with both ears.
CAUTION: Do not use the L-R Master Gain pot, located in the lower right corner to adjust the listening volume of your headphones! Because of its closer placement on the board, some users mistake it for their volume control, since a change to the L-R master track recording gain does result in a change of listening volume. Any changes to that pot will affect the level of the recording.
Monitor Feed for Director/Script
It is customary on major sets to provide wireless headphones to the Director, Script Supervisor, and other personnel as needed (such as an extra boom operator). We use what is referred to as an Assistive Listening System, which consists of a wireless transmitter connected to one of our outputs, and multiple wireless receivers (belt packs) to feed each set of headphones. When connecting to the Tascam, you either utilize Line Output 1, or you can split the signal from the main Headphone Out on the recorder itself.
To split the signal at the Headphone Out jack, simply insert a ¼-inch stereo plug to (2) ¼-inch stereo jack Y-cable, and raise the recorder headphone volume to near maximum (or as loud as needed). Connect the transmitter to one leg of the Y. Connect the other leg of the Y to the headphone input jack of the Remote Fader, as you normally would. Remember that you have a secondary headphone volume control on the Remote Fader itself, which you would use to adjust the sound mixer’s headphone listening level.
Remote Setup of the Fader unit

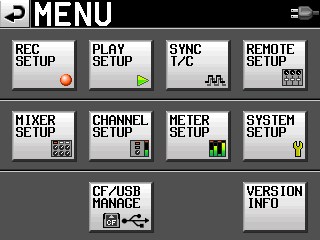 Before you begin recording with the Fader unit, you must set up its parameters. From the MENU button on the recorder, go to the REMOTE SETUP screen. (If there is no remote setup screen present, you need to update your firmware software.)
The Remote Setup screen allows you to assign values to the four Function keys to instantly open some of the menu screens. Many soundmixers like to program F1 as Home (main); F2 as Home (next take name); F3 as Home (pan/level); and F4 as Mixer (low cut filter). However, feel free to program the keys to your own preferences.
Next, you need to select the functions of the slider and encoder knob of the channel modules.
For film/video applications, the slider should control the output level to the L-R master tracks, and the encoder knob should control the trim/gain of the input signal. Select the button marked TRIM/LEVEL. Note that the top word represents the encoder knob, and the lower word represents the slider.
For music recording, you might want to reverse it and use the slider to control input gain, while the encoder knob controls the output to the L-R master tracks. And for live theatre, you might want to have the encoder knob used for instant panning, so that you could follow actors movement across the stage.
Use of the SHIFT KEY
The SHIFT keys are located in the upper left and lower right of the Fader unit.
Their functions are labeled in blue.
Shift+F1 thru F4 gives you quick access to the menu screens that you have programmed.
Pressing the SELECT key by itself, above each channel module, opens the Channel Setup screen for that particular channel.
Shift+SELECT will arm/disaram any channel for recording.
Pressing the SOLO button by itself, above each channel module, will instantly SOLO that channel for monitoring. Pressing SOLO again will exit the SOLO mode.
Shift+SOLO will MUTE a particular channel.