Create a PROJECT
A project is essentially the name of your film or video, along with the basic recording format. It is possible to host multiple projects on the same CF card, even if those projects use different formats.
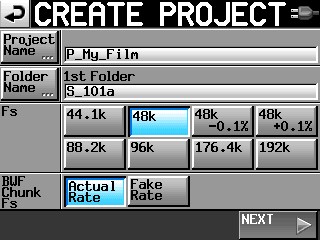 Press PROJECT button. Select Create Project tab at bottom of screen.
Press the tab on the left to NAME your project. DO NOT use the whole word “project” in your new name; it is too long and will not always be displayed! Just abbreviate it as P_ name. (letter P, underscore, brief name or number). Example: P_My_ Film
Press the tab on the left to NAME your folder. Note that TASCAM uses the term “folder” for what we would call “scene” in filmmaking. On the Tascam, you store all of your takes for each scene inside of that scene folder. It is a very organized way of keeping track of stuff!
DO NOT use the whole word “scene” in your new folder name; it is too long! Just abbreviate it as S_ number. (letter S, underscore, scene number/letter). Example: S_101A
Next, select the correct Fs (SAMPLING RATE) for your project. Most of the time, this will be 48k. Sometimes, the post production people will ask for 96k. Depending on your video editing software, you may even be asked to use 47.952 or 48.048, which are labeled as 48k +/-
It is your responsibility to make sure that you record in the correct format and frame rate, so ask the Post Production Supervisor for the correct settings to use. NEVER GUESS. NEVER ASSUME. Different editing houses and labs may prefer different settings according to their software and in-house workflow.
If you are selecting the pull-down or pull-up rate (48k +/-), you can select the FAKE RATE button in order to stamp a 48k label onto a file in order to fool some recorders into performing a pull-up or pull-down in order to sync up with some sprocketed FILM projects. Otherwise, use the Actual Rate setting.
(You select the bit rate, 16 or 24, from the REC SETUP screen, File Format tab, as described further below).
 Select NEXT at the bottom of the screen…
Select the correct FRAME RATE for your project. Most so called 24 frame video and HD video is actually 23.976. Standard video is 29.97 (drop frame or non-drop frame, make sure you know which is correct). Sprocketed or electronic FILM may require 24F or 30ND; be sure to ASK the lab or the Post Production Supervisor.
After entering all of your parameters, you may finalize your choices by confirming the CREATE PROJECT button at the bottom of the screen.
Sync T/C
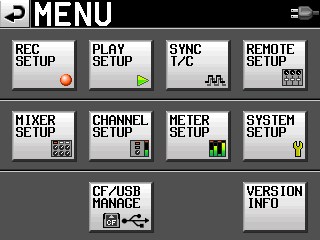 Press the MENU button, and select Sync T/C. This is where you set your timecode details. Note that the timecode frame rate was already set when you selected your FRAME RATE during Project creation.
Go to the TIMECODE tab.
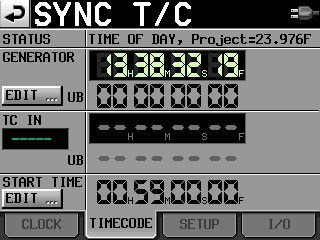 The STATUS window displays the frame rate that you selected for this project.
You can select to EDIT or manually enter User Bits. This is non-changing information that is part of the timecode data, such as a date, production number, or other simple value.
You can also manually enter a start value for the timecode. This will begin when you select the FREE RUN or REC RUN buttons on the setup tab.
 Go to the SETUP tab.
Select a generator mode:
TIME OF DAY refers to whatever time the internal clock is set to. It will continue to generate, even if the Tascam is powered off, so long as there is a battery inside. Many soundmixers prefer this setting, as it is easy for any crew member to know the correct timecode just by looking at their watch!
FREE RUN means that once you manually enter a starting timecode, the generator will continuously run.
FREE ONCE is similar to what Denecke would call a one-time jam sync. The generator will lock onto an incoming timecode signal, sync to it once, and then continue to run on its own after the external or master timecode has been disconnected. (default factory setting) Note that the HS-P82 will subsequently ignore external timecode, unless you switch modes to something else and back again. This is the main difference to JAM SYNC. Kind of what happens when you jam sync the timecode slate to a recorder, but in this instance the recorder jam syncs to an external master source.
JAM SYNC is similar to FREE ONCE, except that the internal timecode generator will continue to read and synchronize to the incoming signal. If the external timecode becomes disconnected, then the Tascam will enter a free run mode. Although Free Once is the factory default, JAM SYNC is the preferred mode to use by most Sound Mixers, since it allows the Tascam to continually update to the latest external (jam sync) code coming in.
REGEN is what we would commonly refer to as external timecode mode. The Tascam reads the incoming timecode, and regenerates it as a clean signal.
REC RUN is when the timecode generator only runs during the RECORD mode. If the Tascam is in stop or pause, so is the generator. This will give all of your recorded files a continuous timecode without gaps. However, cameras and timecode slates will be difficult to maintain sync with, unless you physically cable or transmit to them at all times. Once they are disconnected from the recorder, other devices will have no way of knowing when the Tascam is recording or stopped.
Power Off gen: the factory default setting is OFF. When the TC generator is set to TIME OF DAY, REGEN, or REC RUN – this setting has no effect. The power-off timecode generation requires a battery to be installed in the rear NP slot (the HS-P82 doesn't have a secondary battery just for this purpose).
 The I/O tab allows you to assign the BNC OUT 1 connector as timecode output or AES output; and BNC OUT2 can be WORD sync output or WORD sync throughput. Usually just leave it as timecode out and word out, unless you are doing something advanced (in which case you would know).
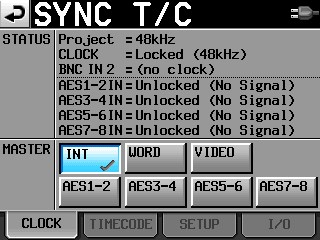
The CLOCK tab is for indicating whether the timecode signal is locking to the internal clock (default), word or video sync, or AES. Usually, just leave it on INTERNAL clock, unless you are doing something advanced.
Panel Lock Function
Depress the HOME button and then the MENU button while still depressing the HOME button, and the panel LOCK/UNLOCK screen will appear. All three of the windows should say UNLOCK. It is possible to lock groups of the controls, should the need arise.